
By James Hanback
If you’re lucky enough to have some old Sierra On-line adventure games lying around your place, you might notice that together they tell a pretty good story about the evolution of computer hardware and storage media from 1980 all the way through the end of the 1990s. Your humble co-adventurer’s earliest Sierra adventures were packaged on a series of 5.25-inch floppy disks. Slightly later in the decade, you could buy Sierra games that included both 5.25-inch and 3.5-inch floppies, because there was a time, dear younglings, when computing folks had either a 5.25-inch floppy drive or a 3.5-inch floppy drive installed in their PCs, but not necessarily both. Waddaya mean, “What’s a floppy drive?”
Most of the games from the late decade could also be installed on your computer’s internal hard drive if you were lucky enough to have a computer that included such a device. Your humble co-adventurer’s first PC didn’t. Ultimately, the latest of the Sierra games, which had evolved from pixelated animation and Musical Instrument Digital interface (MIDI) music to movie-style live action video and sound, came packaged on CDs. However, no Sierra game ever ran better than when it was installed on the computer’s internal hard drive, which was not only capable of accessing data faster than removable media but also didn’t require you to swap said media mid-scene. Thus an internal hard drive equaled smoother and faster play. So it goes with installing Microsoft Windows directly on your non-Windows computer’s hard drive instead of using a desktop virtualization solution.
In the previous four blog posts in our quest to install Boson software in non-Windows environments, we’ve explored ways to virtualize Windows on a Mac (or on Linux, if you are so inclined) so that you can use Boson software without entirely giving up your operating system (OS) of choice. Although virtualization is the safest and most convenient way to run Boson software in a primarily non-Windows environment, there are significant performance benefits to installing Windows on its own physical hard drive partition so that it accesses your computer’s hardware directly instead of communicating with it through a layer of virtualization software.
For Linux users, installing an additional OS on its own partition primarily consists of using a utility like Gnome Partition Editor (GParted) to repartition the hard drive, installing the additional OS on the new partition, and then configuring a boot loader like GNU’s Not Unix (GNU) GRand Unified Bootloader (GRUB) or Microsoft’s NT Boot Loader (NTLDR) to enable the user to choose which OS to load at startup. For Mac users, there’s Boot Camp Assistant, which you can find tucked away inside Mac OS X’s Applications > Utilities folder. It just so happens that the Mac path is the path we’re going to follow in this post’s adventure, so let’s restore our game from last time and amble off to the next scene.
Boot Camp Basics
Naturally, the first thing you need before you can install Windows directly on Mac hardware is some type of Windows installation media, such as a CD, a DVD, or a bootable flash drive. In the processes described in the previous blog posts, you’ve also been able to use an ISO file to install Windows inside a virtual machine (VM). You cannot directly use an ISO file to install Windows by using Boot Camp Assistant. Depending on your hardware and the version of Boot Camp Assistant you are using, you might first need to create bootable physical media from the ISO file. Some versions of Boot Camp Assistant for some versions of Mac OS X on some hardware offer the option of performing this step for you. If you don’t have that option (and your humble co-adventurer didn’t), you can perform this step by using Apple’s Disk Utility application, which is located in the Applications > Utilities folder on Mac OS X. The icon looks something like this:
Using Disk Utility is beyond the scope of this post; suffice it to say that within Disk Utility you can specify which ISO file you want to burn to physical media and then click the Burn button to perform the action. Oh, and while you have Disk Utility open, you might as well go ahead and do a permissions check and a disk check to make sure your disk and Mac environment are in good shape. If there are issues with your Mac OS X disk, Boot Camp Assistant will not be able to repartition it and all your effort will be for naught.
Remember that your co-adventurer’s experiences with Boot Camp Assistant might not precisely mirror yours because your co-adventurer is performing all these steps on a late-2006-model MacBook Pro with an Intel Core 2 Duo processor, Mac OS X 10.7.5, 3 GB of RAM, and an overworked hamster named Igor who tirelessly cranks the CPU fan. That said, you’ll need at least all of the following gear to successfully complete this part of the quest:
- The Windows installation media mentioned earlier
- A valid Windows activation key; otherwise, you’ll be installing a limited trial version of Windows
- An Intel Mac that supports Boot Camp 4 or later
- An administrator account on that Intel Mac
- An external storage device of appropriate size to which you download Boot Camp Windows support files and from which you will install them
- At least 2 GB of RAM (or whatever the minimum requirements of the version of Windows you’re installing)
- At least 20 GB of free hard drive space (or whatever the minimum requirements of the version of Windows you’re installing)
- The guts to repartition your Mac’s hard drive, which by definition puts any data that is stored on that hard drive at risk
More detailed system requirements, including the specific Mac hardware that supports this procedure, are available on Apple’s support site. This also seems like a good place to point out that neither your humble co-adventurer nor his employer will accept any responsibility if you munge your Mac while following the steps outlined in this post. Proceed at your own risk.
The final step to gearing up for this adventure is to make absolutely certain that your Mac OS X device is using the most up-to-date version of software. Click the Apple menu > Software Update to update. Once that’s done, you’re finally ready to launch Boot Camp Assistant.
Booting Up Boot Camp
Now that you have collected your gear, it’s time to boot up Boot Camp Assistant by double-clicking the Boot Camp Assistant application icon in your Mac’s Applications > Utilities folder. The icon looks something like this:

When Boot Camp Assistant launches, you will first be presented with an Introduction screen. This screen contains basic information about what Boot Camp Assistant does and what you need to successfully use it. This screen also contains a big old BACK UP YOUR DATA warning. If you haven’t already backed up your existing data, you should stop everything else, quit Boot Camp Assistant, and heed this warning. The road to a repartitioned, dual-boot hard drive can be treacherous. If something goes wrong along the way, you could lose all your data. If you have not yet backed up your data, go ahead and do it now. Your humble co-adventurer will pause the game and wait here for your return.

Done? Awesome. But before you go clicking that Continue button on the Introduction screen, take a gander at its neighbor on the left, the Print Installation & Setup Guide button. Hiding behind that little dandy is Apple’s official guide to using Boot Camp Assistant and installing Windows on a Mac. At some point during this process, you will boot into the Windows installer and will no longer have access to Boot Camp Assistant’s …ummm… assistance. Therefore, it’s probably a good idea to print this document and have it handy as a reference. Along with the guidance it provides, there are also some helpful troubleshooting tips for when things go wrong (and things can go wrong).
With your manual printed and all safeguards in place, adventurer, you stand at a crossroads. Do you continue installing Windows directly on your Mac hard drive or bail? If you choose the safe route and bail, you do have the other options discussed in previous blog posts. If you’ve heeded all the warnings and advice so far and want to press on, click that Continue button on the Introduction screen.
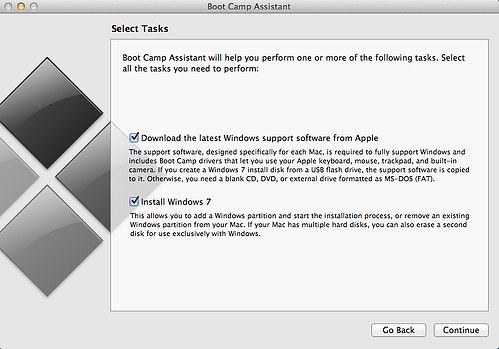
And what do you get when you choose a path at a crossroads? Another crossroads, of course. After the Introduction screen, you’ll be presented with the Select Tasks screen. Again, the options you see on this screen might vary depending on the version of Boot Camp Assistant you are using, the version of Mac OS X you are using, and your hardware. Some adventurers might see a Create a Windows 7 install disk option. Others will not. By default, Boot Camp Assistant will automatically select two of the available tasks: Download the latest Windows support software from Apple and Install Windows 7.
The Download option attempts to automatically download the Boot Camp Windows support software from Apple and copy it to File Allocation Table (FAT)-formatted removable media, such as a flash drive. The Boot Camp Windows support software includes Windows drivers for Mac computers as well as a Boot Camp Windows Control Panel applet that enables you to configure some aspects of how the Mac interacts with Windows. If for some reason Boot Camp Assistant cannot automatically download the Windows support software, you can manually download it for your version of Boot Camp from Apple. Just remember to copy the software to a FAT-formatted flash drive so that you can access it after your Mac has booted into Windows for the first time.
The Install Windows 7 option requires much less explanation. It simply performs the repartitioning work on your hard drive and then configures the Mac to reboot from your Windows installation media. When you have selected your options, click the Continue button.
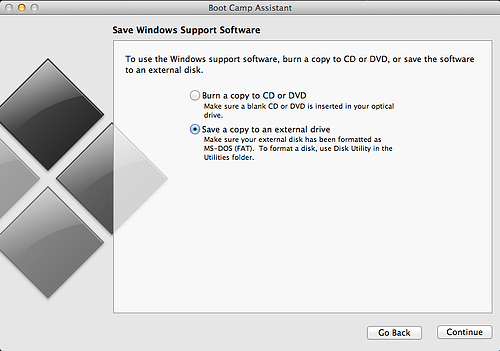
Assuming you want Boot Camp Assistant to attempt to automatically download the Windows support software, you will, upon clicking the Continue button, find yourself at another crossroads. Boot Camp Assistant can automatically burn the Windows support software it downloads to a CD or DVD or copy it to an external FAT-formatted removable drive, such as a flash drive. If you want to burn the software to a CD or DVD, you will need to insert blank media into your Mac’s optical drive. If you want to copy the files to an external disk, you will need to connect the external disk and ensure that it has been FAT formatted. Disk Utility, mentioned earlier, can perform the formatting for you. Select the way you want to go, and click Continue.
Next, Boot Camp Assistant will attempt to download the Windows support software. However, sometimes Boot Camp Assistant fails. There are any number of reasons Boot Camp Assistant might not be able to directly download the support files. If it can’t, you’ll see a dialog box message that says something like Can’t install Windows Support Software because it is not currently available from the Software Update server. If that happens, your only recourse will be to manually download the appropriate support software and manually copy it or burn it to the removable media of your choice. You will then need to go back to the Select Tasks screen in Boot Camp Assistant and clear the Download the latest Windows support software from Apple option so that you do not become mired in an unsatisfying and demoralizing infinite loop of download failure messages.
Next, Boot Camp Assistant will move on to the Create a Partition for Windows screen. Here’s where you need to decide how much of your precious Mac hard drive you’re willing to dedicate exclusively to Windows. If you’re lazy, you can just click the Divide Equally button and Boot Camp Assistant will automatically attempt to reserve half of your hard drive for Windows. However, you should ensure that dividing equally will leave enough space on your Mac OS X drive for the OS to operate and for your own data storage. You can check that by examining the statistics in the Mac OS X partition side of the slider on this screen. The statistics will tell you how much hard drive space will remain free on your Mac OS X partition after the repartitioning is complete.

If you plan on using the Windows partition to run only a few applications and not to store gobs and gobs of data, your best bet is to reserve only a small portion of your hard drive for Windows: the minimum that the OS requires plus a good amount of space for whatever applications you plan to install, plus a little bit of room for caching and any other growth by use. Once you’ve made your choices, the only thing left to do is click that little Install button, hope your hard drive is in good condition, and hope that you haven’t messed something up during the previous steps because Boot Camp Assistant takes over everything from here until your first interaction with the Windows installer program.
Here comes the scary part. After you click the Install button, you’ll see a partitioning progress meter appear below the Divide Equally button. One of several things can happen: it’ll be the barber pole-style progress meter for a while and then eventually tell you that your hard drive has issues that are preventing partitioning; it’ll pause at the beginning of the process for a while and then eventually start moving until it successfully repartitions your hard drive; it’ll move for a while but then hang and you’ll give up and hard shutdown the machine, potentially destroying your data in the process. If that last bit happens, let’s hope you heeded your humble co-adventurer’s advice about verifying your hard disk integrity beforehand and making a backup of all your data.
Booting Up Windows
If all goes well with the repartitioning, your Mac will eventually reboot and (assuming you were wise enough to insert the Windows installation media into whatever receptacle it requires) launch the familiar Windows installation program. We’re going to assume for the purposes of this post that you’re installing Windows 7 Professional. However, the process from here on out should be similar regardless of the version of Windows you are installing.
The Windows installation procedure consists of two parts: collecting information and copying files. The first part will require your attention. The second part can pretty much be left to its own devices.
When the information collection process begins, the installer will present you with several screens of questions, on each of which you should click either the Next button, the Install now button, or the Skip button (if available) if you want to skip that part of the questionnaire. You will be asked to provide all of the following:
- The language you want Windows to use
- The time format and currency format you want Windows to use
- The keyboard layout you want Windows to use
- Your acceptance of the Microsoft Software License terms
- The type of Windows installation you are performing (upgrade or new/custom)
- Where you want to install Windows
Make sure you choose the correct partition for that last bullet. The Windows Setup program will provide you with a list of hard drive partitions, including the partition labeled BOOTCAMP. That’s the one Boot Camp Assistant created for your Windows installation. Therefore, you should select the BOOTCAMP partition for your Windows installation. Do not choose any of the other partitions. If you reformat any of the partitions that are not named BOOTCAMP, you will potentially destroy your Mac OS X installation.
The Windows Setup program might inform you that Windows cannot be installed on the BOOTCAMP partition. That’s not entirely true. Windows cannot yet be installed on the BOOTCAMP partition, because Boot Camp Assistant only created new hard drive space for a Windows installation; it did not bother to properly format the new partition for that installation.
Fortunately, Windows Setup gives you the option to format the BOOTCAMP partition right there on that same screen. Make sure the BOOTCAMP partition is selected, and then click the Format button. A dialog box will inform you that this process will destroy any data that currently exists on the drive. That’s OK with you because it’s a new partition and there’s no data on it yet, right? So click the OK button. In a short span of time, the little warning that Windows cannot be installed on the BOOTCAMP partition should disappear. You should then ensure that the BOOTCAMP partition is still selected and click the Next button.
Now it’s time for the Windows Setup program to do what it does best: copy files, expand files, install files, and complete the installation. All you need do, dear adventurer, is wait and know that your Mac might automatically restart and relaunch the Windows installation process a couple of times before all is said and done.
After the installation process completes, Windows Setup will again ask you for some information, including all of the following:
- A user name for yourself
- A network name for your computer
- The creation of a password (make it a strong password)
- Your Windows product key
- Your preference for Windows Update settings
- Your geographic time zone
- The current date
- The current time
At this point, you might be asked to join a network if Windows detects that there are networks available. Click the Next button when you are done. You can also click the Skip button to skip this step. If you join a network, you’ll next be prompted to tell Windows whether the network is a home network, your work network, or a public network. Click on the appropriate choice.
Booting Up the Windows Support Software
Finally, you’ve entered the clearing (or cluttering, as the case may be) of the familiar Windows 7 desktop, unless you installed Windows 8, of course. But you are not done. Remember that Boot Camp Windows support software you downloaded and copied to removable media before you started the installation process? Now you must install it. Until you install the software, your Mac’s display might not operate at an optimal resolution when Windows is running. Additionally, some network, keyboard, mouse, trackpad, and audio features might be missing.
Convinced? Good.
If you manually downloaded and copied the Boot Camp Windows support software as a ZIP file to the media, drag the ZIP from your media to the Windows desktop. Next, double-click the ZIP file on your desktop. Inside the ZIP file is a folder that is simply titled BootCamp. Drag this folder from the ZIP file to your Windows desktop. When the copy is complete, double-click the BootCamp folder on your desktop to open it.
If, on the other hand, your removable media simply contains the Boot Camp Windows support files outside of their original ZIP file, you can either copy all those files to a folder on your Windows desktop or just double-click the setup program on the removable media to launch it. Either way, you’ll need to double-click that setup program. So do that.
Windows might ask you if you are sure you want to allow the setup program to make changes to your computer. Yes. Yes, you are. Click the Yes button. Similar to the Boot Camp Assistant application, you will then be presented with an introduction screen. Click the Next button.

You will next see Apple’s license agreement. Read it, select the I accept the terms in the license agreement radio button, and then click the Next button.
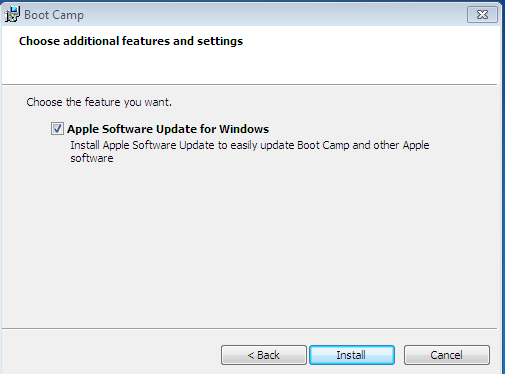
Finally, you’ll be asked to select which additional features you want to install. In your humble co-adventurer’s experience, there was only one additional feature option, Apple Software Update for Windows, so he selected the check box by that option. If we’re going to install this software, we might as well keep it up-to-date. When you’re done selecting options, click the Install button and wait for the installation to complete.
Finally, click the Finish button to quit the installer. Boot Camp will prompt you to restart your Mac, which will ultimately result in the activation of all the nifty new drivers you just installed. Click the Yes button to restart. Again, your humble co-adventurer’s MacBook Pro preserved the BOOTCAMP partition as the active startup disk. If your experience is different, you can always hold down the Mac Option key during a reboot to select the startup disk you want to use.
Booting Up Windows Updates
After your Mac restarts and you’ve managed to navigate your way back to the Windows desktop, you should next ensure that the new Windows installation is protected against known threats from out there on the Internet. Protecting your Windows installation consists of the following steps:
- Install some antivirus software. There are myriad vendors you can evaluate and from which you can purchase.
- Apply the latest Windows updates. In Windows 7, you can perform this action by clicking Start > All Programs > Windows Update.
- Review Windows Firewall settings. In Windows 7, you can do this by clicking Start > Control Panel > System and Security > Windows Firewall.
After you’ve updated Windows, you might also want to manually run the Apple Software Update application (assuming you elected to install it) to ensure that you have the latest version of Apple’s Windows support software. You can launch Apple Software Update by clicking Start > All Programs > Apple Software Update. Only after you’ve performed the above steps should you venture on to the next scene in our quest.
Booting Up Boson Software in Windows
There’s no trick to this, of course. Boson software installs on a copy of Windows that is installed directly on hardware the same way it does in a virtual environment. However, here’s the walk-through in case you need a refresher:
- Obtain the appropriate setup file from the Boson downloads page.
- To install the Boson Exam Environment, double-click the BosonExamEnvironment-Setup.exe file.
- Click the Next button to proceed to the License Agreement screen, select the I accept the terms in the license agreement check box, and click the Next button.
- Choose the install location, and then click the Next button.
- Click the Install button.
- The setup program will install the Microsoft .NET framework if it is not already installed.
- To install the Boson NetSim Network Simulator, double-click the netsim9.exe file.
- Click the Install button to download and install the Microsoft .NET framework if it is not already installed.
- Click the Next button on the NetSim InstallShield Wizard Welcome screen.
- Click the Next button to install NetSim in the default location.
- Click the Install button to start copying files to the VM.
- Click the Finish button.
Propping Your Boots On Your Desk at Your Journey’s End
What’s this we see as our pixelated adventurer wanders into the next scene? We’ve come to another clearing. Here MIDI trumpets are sounding. Pixelated fireworks are rocketing into the air and bursting against the background in an array of composite 16-color glory. Credits are rolling. Our extended quest to run Boson software in a non-Windows environment is finally at an end.
No matter which path you chose way back at the beginning, you should now be able to install and enjoy Boson software in your otherwise non-Windows environment. Rather than save our game here as we’ve previously done, we can choose to quit our adventure and allow its memory to evolve over time into the kind of weird nostalgia we nerd types sometimes have for our more triumphant technological moments.
Or, we can continue poking around in our little virtual world for a few minutes more because we might stumble upon a few Easter eggs. As you probably already know, an Easter egg in computer software terms is a hidden extra feature or fun aside in the code. Sierra, like many other software developers, often included these little extras in their games. For example, if you look behind the tapestry in the wizard’s house in King’s Quest III, you’ll find an amusing little message about the forthcoming next installment in the series.
Below is a short list of a few features that, although not Easter eggs in the strict software development sense of the term, we have not yet discussed:
- After installing the Boot Camp Windows support software on your BOOTCAMP partition, you might be interested to know that you can still access and use data files that are stored on your Mac OS X hard drive, even when you are running Windows. Click Start > Computer in Windows and you should find that your Mac OS X partition is listed among the hard drives you are able to browse and use.
- After installing Windows on your BOOTCAMP partition, you might notice that you can access the data files that are on that partition from within Mac OS X. In fact, if your Mac OS X desktop is configured to display external devices, Mac OS X will mount the BOOTCAMP partition right there on your desktop when you next boot into Mac OS X.
- We’ve discussed desktop virtualization products in previous blog posts, but did you know that in some virtualization products, such as Parallels Desktop for Mac, you can actually virtualize your BOOTCAMP partition, enabling you to run the copy of Windows installed there inside a VM? So if you get tired of rebooting your machine just so you can run applications built for an alternate OS, you can opt to replace that process with desktop virtualization without losing any of the applications, settings, or documents you might have already installed or created on the BOOTCAMP partition.
- In the first post in this series, your humble co-adventurer mentioned a potential sixth option for running .NET-based applications on non-Windows platforms. Wine (and its commercial implementations, CrossOver Mac and CrossOver Linux) is essentially a translator that converts Windows API calls into POSIX-compliant calls. Thus Wine can sometimes be used to run Windows applications without Windows and without a desktop virtualization solution. However, as of this writing, neither Wine nor the commercial CrossOver products were capable of running Boson software without some significant usability issues. However, you are welcome to adventure onward and give it a try on your own. Give us a shout about how you did it if you succeed.
Now, weary from the length of our journey and basking in the glow of its success, we can finally quit our game and place .NET Quest on the shelf. To be sure, other adventures will follow. For what purpose is there to end a quest other than to begin a new one? In the immortal words of the immortal developers of all those immortal games from the once seemingly immortal game development company known as Sierra On-Line: Happy Adventuring!