
By James Hanback
As 1980s home computing graphics technology improved and paved the way for the early 1990s, so did the animated graphical adventure worlds created by Sierra On-Line grow more detailed and artistically rendered. By the time the first King’s Quest was unleashed upon the world, Color Graphics Adapter (CGA) technology had given way to Enhanced Graphics Adapter (EGA) technology. By the early 1990s, EGA gave way to Video Graphics Array (VGA) technology. More pixels and more colors meant a better level of detail for the gamer. VGA graphics were such an improvement over previous display technologies that Sierra actually rereleased some of its classic games with updated graphics and some modified play. Instead of typing commands to interact with the game, you could use a mouse to select icons or tools that you could apply to the character to make him or her perform actions in the game. However, some gamers—your humble co-adventurer among them—actually preferred the older command interpreter-style play of those first editions.
So it goes. Every individual’s preferences are unique. Keyboard or mouse, Mac or Windows (or Linux), this virtualization software or that virtualization software: everyone has their own taste. In the previous blog post in this series, we explored the use of VMware Fusion for installing Boson Software in a Mac OS X environment. This time, we’ll send our little pixelated adventurer down the alternate path of installing Boson Software in Parallels Desktop for Mac. Similar to VMware Fusion, Parallels Desktop for Mac enables you to create virtual machines (VMs) that run different operating systems (OSs) without having to shut down your Mac OS X environment. Also like VMware Fusion, Parallels enables you to hide the guest OS so that applications that are running in the VM appear to be running directly on the Mac OS X desktop.
Both VMware and Parallels like to present themselves as the faster and more robust VM solution for the Mac. Your co-adventurer is not here to test or judge that, if for no other reason than the fact that he’s tested both solutions on a late 2006 model MacBook Pro with an Intel Core 2 Duo processor, Mac OS X 10.7.5, only 3 GB of RAM, and about 30 seconds of battery life when fully charged. You might have a bigger budget or higher standards. Also, you can easily find some good third-party side-by-side comparisons of the VM competitors by spinning up Google and searching for “VMware Fusion vs. Parallels Desktop for Mac.”
One important difference between the two products as of this writing is that VMware Fusion is approximately $20 lighter on the pocketbook than Parallels Desktop for Mac. However, the price of Parallels is significantly discounted if you are upgrading from a previous version of Parallels or if you are switching from VMware Fusion to Parallels. It is also important to note that using a commercial virtualization solution to run Boson software in a non-Windows environment will increase your total cost of ownership (TCO) by the cost of the virtualization solution, the cost of the guest OS, and the cost of your Boson license or licenses.
Before we can start strolling down the Parallels path, you should ensure that you have the following items in your adventurer’s inventory:
- An Internet connection
- An Intel Mac with a Core 2 Duo or better processor, at least 2 gigabytes (GB) of RAM (4 GB is recommended for running Windows 7 or later), and a hard drive with at least 700 megabytes (MB) of disk space on the boot volume for Parallels Desktop and at least 15 GB of disk space for every Windows VM you intend to create
- Mac OS X 10.6.8 (Snow Leopard) or later
- A copy of Parallels Desktop for Mac
- A Microsoft Windows installation medium (CD, DVD, or ISO file) and a valid Windows product key; Parallels Desktop supports VMs for Windows Vista, Windows 7, and Windows 8 as well as Windows XP, although as of this writing, official Microsoft support for Windows XP is ending in April 2014
- A copy of either the Boson Exam Environment setup program or the Boson NetSim Network Simulator setup program, depending on the product you want to install; you can download both setup programs from the Boson download page
- The willpower to restrain yourself from tumbling, tweeting, Facebooking, or… Plus Oneing?... long enough to complete this procedure
Ready to begin? Let’s restore our game from the previous post and thus enable our adventurer to saunter off to the next scene.
Installing Parallels Desktop for Mac
As with most tasks that are not directly related to quantum physics, you must have a copy of a product before you can begin using that product. Therefore, your first step in this part of the journey is to obtain the latest version of Parallels Desktop for Mac. As of this writing, Parallels Desktop for Mac is at version 9. You can choose to purchase the product or try it free for 14 days. If you choose to download the trial, you will be asked to provide your e-mail address and to select whether you are evaluating the product for business use. If you choose to purchase the product, you will be e-mailed an activation key that you will need for the post-install registration and activation process.
After you download the Parallels Desktop 9 for Mac Apple Disk Image (DMG) file, launch the file by double-clicking it in the Mac OS X Finder. The DMG file is a disk image that will mount as a virtual disk on your Mac OS X desktop. Inside the mounted disk image is the Parallels Desktop for Mac installer. Double-click the installer to begin the installation process, and then follow the prompts.
Before the installation process begins, Mac OS X might warn you that the application you are attempting to launch was downloaded from the Internet and ask you if you want to proceed. Click the Open button to allow the installer to continue. You might also be prompted for an administrator password in order to allow the installer to copy the appropriate files to the Mac OS X Applications folder.
After the installation process is complete, Parallels Desktop for Mac will automatically launch and present you with the Register to Get Started screen. At this point, you will either need to sign in to your existing Parallels.com account or create a new one. Creating a new account will require your name, e-mail address, and the creation of a password. You will also receive an e-mail from Parallels with a link you must click in order to confirm the account creation.
Next, you must either activate Parallels with the activation key you received in your Parallels Desktop activation e-mail or activate a trial version by clicking the Get Trial button. An Internet connection is required to activate the product. When you are notified that Parallels Desktop has been successfully activated, click the OK button.
Immediately after you successfully activate Parallels Desktop for Mac, you will be presented with the New Virtual Machine screen. That’s convenient because creating a new Parallels VM is exactly the next step on our quest to install Boson software in a non-Windows environment. Just remember that when you eventually quit Parallels Desktop, you can always relaunch it from the Applications folder. You can also drag its icon from the Applications folder to the Dock for more convenient single-click access. Finally, you can access the New Virtual Machine screen again by clicking File > New in the Parallels Desktop menu.
Creating a Windows Virtual Machine
The New Virtual Machine screen is akin to some of the crossroads a gamer might encounter in the old Sierra On-Line adventure games we’re emulating in this series of posts. The path you choose here strongly influences the VM user experience you will have. For example, if you clicked the Install OS X Lion Using the Recovery Partition button as shown in the following screen shot, you would be headed down the wrong road if your goal is to run Boson software.
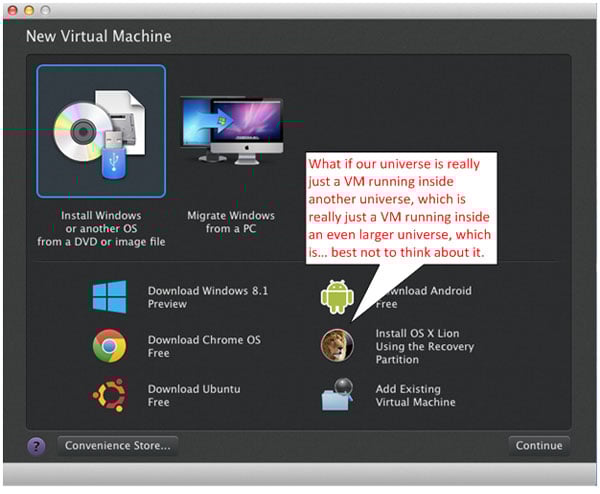
But you’re smarter than that. You know that the Boson Exam Environment and Boson NetSim Network Simulator only run on Windows, so you can use the process of elimination to determine that you should be able to create a Windows VM by clicking one of the following icons:
- Install Windows or another OS from a DVD or image file
- Migrate Windows from a PC
- Download Windows 8.1 Preview
For this walk-through, your humble co-adventurer is going to assume that you are installing a clean and licensed copy of Windows from a disc, flash drive, or ISO file. So click the Install Windows or another OS from a DVD or image file icon and then click the Continue button.
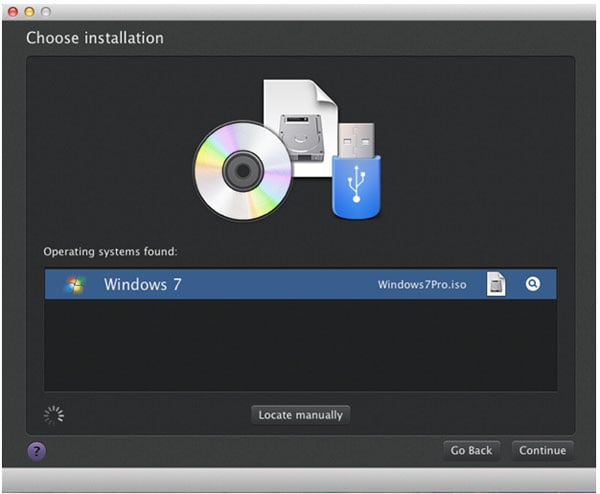
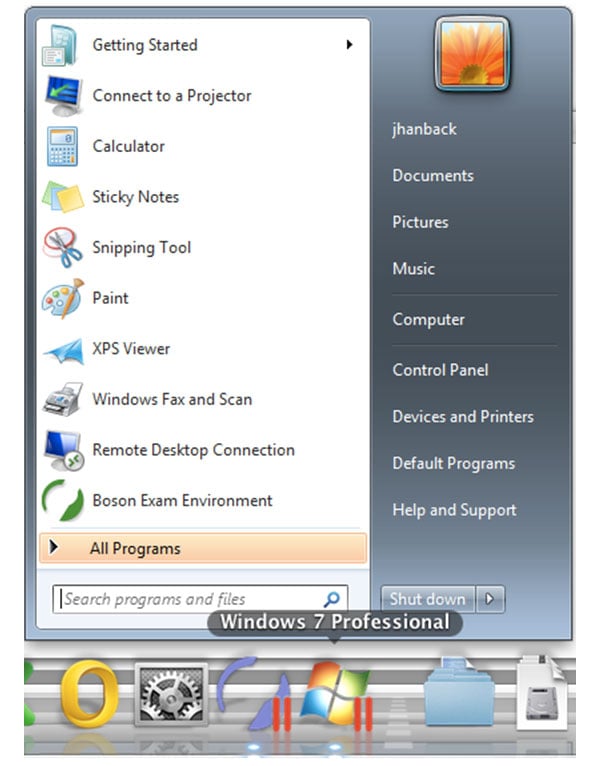
Next you will see the Choose Installation screen. The beauty of this little intersection along our path is that Parallels Desktop can attempt to automatically locate a legitimate OS installation file or medium on your file system. If an installation file or medium is found, you will see its name appear in the Operating Systems Found area. If Parallels Desktop is unable to locate an installation file or medium, you can click the Locate Manually button to browse your computer’s file system. In the screen shot below, Parallels Desktop has automatically located and selected a Windows 7 Professional ISO image. After you have selected an OS to install, click the Continue button.
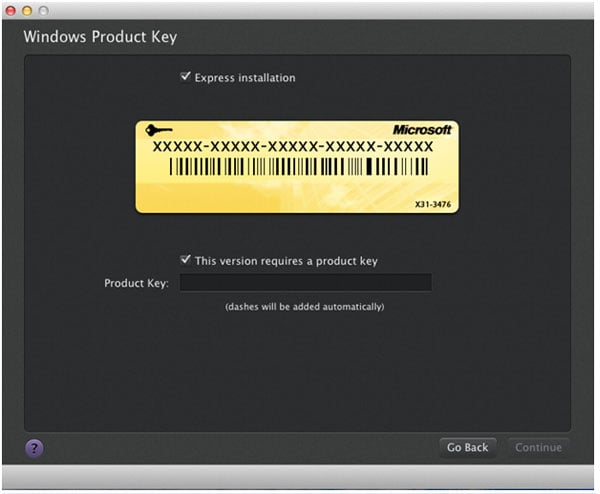
On the next screen, you will be prompted to enter your Windows product key in the Product Key field. If the OS you are installing does not require a product key, or if you are installing a trial version of Windows, you can clear the This version requires a product key check box to activate the Continue button. You might also notice the Express installation check box. This check box is selected by default, and you can leave it that way. The express installation process automatically installs software known as Parallels Tools after completing the OS installation. Similar to VMware Tools, Parallels Tools is a set of drivers and utilities that enhance the VM experience and enable some neat little integration tricks between the guest OS and the host OS. If you clear the Express installation check box, you will need to manually install Parallels Tools later. After you have entered the product key, click the Continue button.
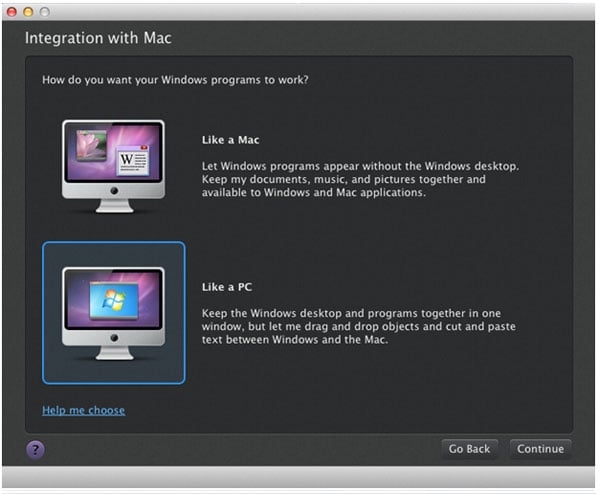
Up next is the biggest decision you will make on this path of the quest. Do you integrate the Windows VM with the Mac OS X host, or do you stick Windows in its own little pocket universe like Post-Crisis Superboy (or Rose Tyler, if you happen to be Whovian). As we noted in the beginning, it all depends on your personal preference. Clicking the Like a Mac icon on the Integration with Mac screen will configure the Windows VM to share documents, music, pictures, and other data with Mac OS X. For example, documents in your Mac OS X Documents folder will also appear in your Windows Documents folder. The Like a Mac icon also automatically configures the VM to use Parallels Desktop’s Coherence view. Coherence hides the VM’s OS, which allows the VM to fool you into thinking that you are running Windows applications directly on your Mac OS X desktop.
The Like a PC icon, on the other hand, configures the VM to run in its own little pocket universe, mostly unaware of the Mac OS X host that encompasses it. However, you can still share documents from your Mac by dragging and dropping them into the VM window. Files you drag into the VM window will be copied to the Windows VM rather than literally shared with the host OS. Sort of like that quantum theory that postulates that every choice you make automatically creates a parallel universe in which you made the other choice. Hmmm, the product name is Parallels…. Yeah, I know. Brain hurt. Let’s get back to our quest. If you choose Like a PC, Parallels Desktop will also create a virtual hard drive that mounts on your Mac OS X desktop whenever the VM is running. That means you can access files that are stored in the VM directly from the Mac OS X Finder instead of copying them from the VM to the host OS. Similarly, you will find a network-mounted share of your Mac OS X home folder in the Windows 7 Computer window.
For this example, we’re going to select the Like a PC icon. When you have made your selection, click the Continue button.
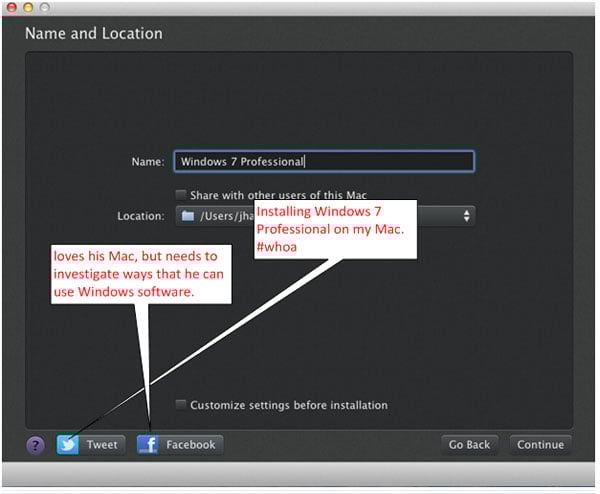
Now Parallels Desktop will want to know what name to use to describe the VM it is creating. It will also allow you to change the location where the VM will be stored on the host file system. If you’re going to use one Windows VM for all your Windows applications, you might as well name the VM Windows or Windows 7 Professional. If you plan to have multiple Windows VMs, it’s probably a good idea to choose a name that represents the purpose of the VM. For example, Boson Applications might describe the VM if its sole purpose is to enable you to use Boson software in your non-Windows environment.
Lastly, the Customize settings before installation check box on the Name and Location screen enables you to customize the virtual hardware on which the VM will run. If you select this check box, Parallels Desktop will enable you to configure the number of processor cores, the amount of RAM, the amount of Mac file system space the VM will use, and other things that you want to differ from the defaults Parallels Desktop would otherwise automatically choose based on the OS you are installing. Similar to VMware Fusion, you can also change these settings after the OS installation is complete. To do so, shut down the VM and click the gear icon in the lower right corner of the VM's window.
For some reason, perhaps because this is the last step before the OS installation process actually begins, Parallels chose this point in the VM creation process to add social media links to Twitter and Facebook. Just in case you want to share with your friends that you are planning to run a Microsoft Windows VM on your Mac. You can add that to the photos of your dog and the status update that lists what you had for breakfast. When you are sure of your choices, click the Continue button.
Configuring Windows in Parallels Desktop for Mac
Now that the VM is configured, the Windows setup program will begin. You might need to inform the setup program about which version of Windows you’re installing, as shown in the following screen shot:
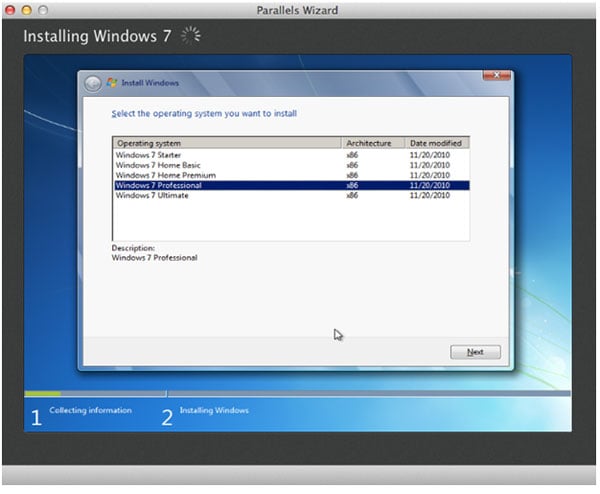
In this example, we’re installing the 32-bit version of Windows 7 Professional, so that choice has been selected. After you click Next, the setup program will copy files, restart, configure some stuff, restart again, and so forth. At some point, you might also see a progress meter for the Parallels Tools Installation Agent, as shown in the following screen shot:
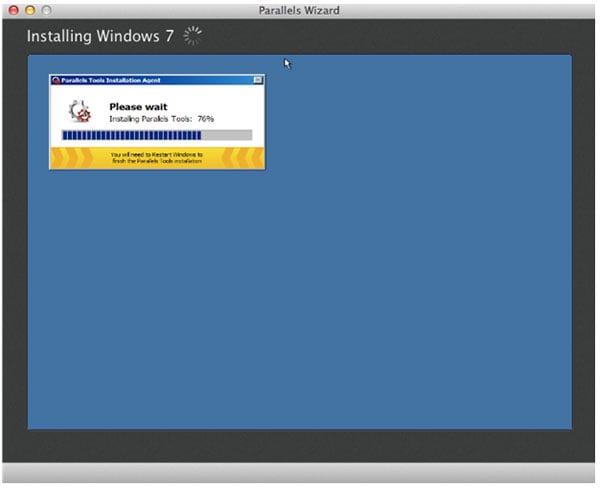
Remember? We left the Express installation check box selected way back on the Windows Product Key screen. This progress meter is a perfectly natural consequence of that.
Ultimately, you’ll end up at a Windows desktop. If you followed along with the previous blog post about VMware Fusion, you might by this time have noticed a significant difference between the two virtualization products. Unlike VMware Fusion, Parallels Desktop never asked you to define a Windows user account and password. Thus, you were not required to log on to Windows to obtain access to the VM.
The good news is that you can change that. For example, in Windows 7, you can assign a secure password to your account by clicking Start > Control Panel > User Accounts and Family Safety > Change Your Windows Password. After you have assigned a secure password, click Start, type netplwiz in the search box, and press Enter. Select the Users must enter a user name and password to use this computer check box, and then click the OK button.
Next, you should probably install some antivirus software. You can choose your own flavor from out there in the Ether or you can click Virtual Machine > Install Internet Security in the Parallels Desktop menu. The latter option will install a Parallels-specific antivirus solution that is developed in cooperation with Kaspersky, but only if you are not using the trial version of Parallels Desktop. You should also apply any available security updates to Windows by using Windows Update. (In Windows 7, you can perform this action by clicking Start > All Programs > Windows Update). You should also consider examining Windows Firewall (Start > Control Panel > System and Security > Windows Firewall) settings for potential problems.
Only after you are certain your Windows VM is up to date and protected should you begin the next phase of the process, which is the installation of Boson software.
Installing Boson Software in a Parallels Desktop Virtual Machine
Your humble co-adventurer covered the steps for installing Boson software in a VM in his last post, but in the interest of not forcing you to open yet another new browser tab, here’s a short refresher:
- Obtain the setup file for either the Boson Exam Environment or the Boson NetSim Network Simulator from the Boson downloads page.
- To install the Boson Exam Environment, double-click the BosonExamEnvironment-Setup.exe file.
- Click the Next button to proceed to the License Agreement screen, select the I accept the terms in the license agreement check box, and click the Next button.
- Choose the install location, then click the Next button.
- Click the Install button.
- The setup program will install Microsoft .NET 3.5 Service Pack 1 if it is not already installed.
- To install the Boson NetSim Network Simulator, double-click the netsim9.exe file.
- Click the Install button to download and install Microsoft .NET 4.0.
- Click the Next button on the NetSim InstallShield Wizard Welcome screen.
- Click the Next button to install NetSim in the default location.
- Click the Install button to start copying files to the VM.
- Click the Finish button.
Blending Your VM’s Boson Software with Your Mac OS X Desktop Environment
As you walk our adventurer onto the last scene of this part of our quest, you might recognize the little clearing from which he next emerges. This is the place where, like last time, you learn how to hide the VM’s OS and use Boson applications as if they were a native part of Mac OS X. As stated previously, Parallels named their implementation of this feature Coherence whereas VMware named theirs Unity. Either way, the result is similar.
Way back on the Integration with Mac screen, you were asked to choose Like a Mac or Like a PC. If you chose Like a Mac, you can safely assume that your part in this journey is at an end because you are already hiding the VM’s OS. Coherence becomes the default Parallels Desktop view if you choose Like a Mac.
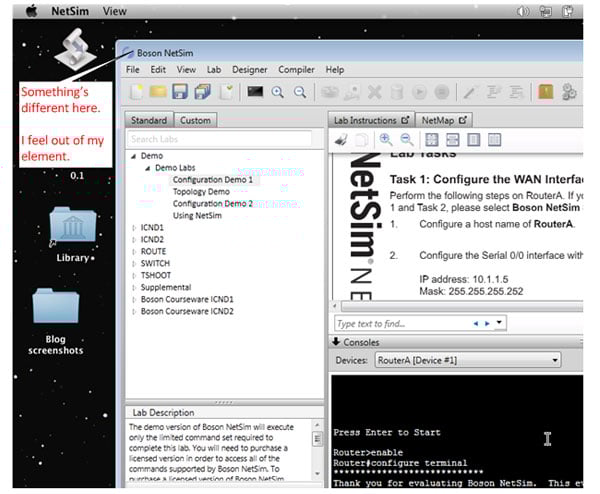
If you chose Like a PC, you can switch from Parallels Desktop’s Modality view, which is the default view for Like a PC and shows the VM running in a window. You can switch to Coherence by clicking View > Coherence from the Parallels Desktop menu bar. You can also get there by using the Control+Command+C keyboard shortcut. Below is a screen shot of Boson NetSim Network Simulator running in Parallels Desktop’s Coherence view. Notice how it gives the appearance of running natively in Mac OS X.
You can exit Coherence by clicking the red Parallels logo in the Mac OS X menu bar and then clicking Exit Coherence. Similar to VMware Fusion, Parallels Desktop also offers a Full Screen view that can be accessed from the Parallels Desktop View menu or by using the Control+Command+F keyboard shortcut. The Control+Command+M keyboard shortcut activates Modality view.
When you enter Coherence, the VM’s window will disappear and any Windows applications you were running inside the VM will be redrawn directly against the Mac OS X desktop. You might also notice a new icon in the Mac OS X Dock that looks like the Windows logo with a Parallels logo superimposed on it. If you click that icon, you get a standard Windows Start menu for easy access to the VM’s applications and settings.
Now, once again, we’ve reached the point where we must save our game. The third task in our .NET quest is complete.
From here, some of you may consider your journey at an end. For others, the TCO involved in licensing either VMware Fusion or Parallels Desktop might be a deal-killer for implementing a VM to run Boson software in a non-Windows environment. If such is the case, you will need to wait for the next installment in our quest, which is .NET Quest, Part IV: The Great VirtualBox Breakout.