
By James Hanback
It probably came as no surprise to the developers of mid-1980s computer role-playing adventure games like King’s Quest that some players might get impatient, frustrated, or just plain stuck while trying to decipher the varied solutions to the puzzles they encountered along the way. In fact, guides to completing such games, known as walk-throughs, became a clever way to make a little bit of additional revenue on the sale of a game. For many games, you could purchase a printed walk-through. Some of them even came with little red cellophane decoders that enabled you to reveal only specific clues to yourself as you followed along, thus allowing you to preserve some of the mystery of playing the game without a guide. Late in the decade, there were also some automated 1-900 hint lines you could call that, for a per-minute fee, would guide you through the particular part of the game that was frustrating you. These days, of course, you can get all the walk-through you need for free on the Internet. Back in 1984, the term Internet had only been around for a couple of years and the world’s first Web browser was still six years away.
We now live in a more “instant information” culture, so as we restore the game on our continuing quest to use Boson software in non-Windows environments, consider this post your (free on the Interwebs!) walk-through for successfully installing and using Boson software on Mac OS X by using VMware Fusion. As noted in the previous post on the topic, VMware Fusion is commercial desktop virtualization software that enables you to run other operating systems (OSs) on virtual hardware in Mac OS X. Therefore, you can access and use Windows applications from your Mac. Similar software, known as VMware Workstation, can be obtained to configure desktop virtual machines (VMs) that run on Windows and Linux PCs. You should remember that the VM method of using Boson software can raise your total cost of ownership (TCO). In addition to the cost of your hardware and the cost of the host OS (if the host OS is not free), you incur the cost of the virtualization software, the cost of the guest OS license, and the cost of the Boson software.
To complete this walk-through, you’ll need to gather the following items in your adventurer’s inventory:
- An Internet connection
- A 64-bit Intel Mac with a Core 2 Duo, Xeon, i3, i5, i7, or better processor, NVIDIA 8600M or ATI 2600 or better display capabilities, at least 4 gigabytes (GB) of RAM, and a hard drive with at least 750 megabytes (MB) of disk space for VMware Fusion and at least 5 GB of disk space for every VM you intend to create
- Mac OS X 10.7 (Lion) or later (Mac OS X 10.7.5 or later is recommended)
- A copy of VMWare Fusion
- A Microsoft Windows installation medium (CD, DVD, or ISO file) and a valid Windows product key; VMware Fusion supports VMs for Windows Vista, Windows 7, and Windows 8 as well as Windows XP, although as of this writing, official Microsoft support for Windows XP is ending in April 2014
- A copy of either the Boson Exam Environment setup program or the Boson NetSim Network Simulator setup program, depending on the product you want to install; you can download both setup programs from the Boson download page
- An adequate amount of time without too much distraction
In the interest of full disclosure, your humble co-adventurer should admit that he actually tested this process over a two-day period by installing VMware Fusion 6.0.2 on a late 2006 model Mac Book Pro with an Intel Core 2 Duo processor, Mac OS X 10.7.5, and only 3 GB of RAM. The VM he created was installed with the 32-bit version of Microsoft Windows 7 Professional. However, to protect your own sanity and prevent hardware defenestration, you’re probably better off sticking to the system requirements above.
Ready? Let’s restore our saved game from last time, hit the right arrow key, and start our stroll through the realm of VMware.
Installing VMware Fusion
Naturally, the first thing you want to do is obtain the latest version of VMware Fusion. If you’re given a choice, select the version that includes VMware Tools. The whole package, including VMware Tools, is a 511 MB download in Apple Disk Image (DMG) format. VMware Tools contains software that fixes some driver issues, such as low-resolution video and missing sound, that can occur when running Windows in a VM on a Mac.
After the DMG file downloads, launch the file by double-clicking it in the Mac OS X Finder. The DMG file is a disk image that will mount as a virtual disk on your Mac OS X desktop. Inside the mounted disk image is the VMware Fusion installer. Double-click the installer to begin the installation process, and then follow the prompts.
Before the installation process begins, Mac OS X might warn you that the application you are attempting to launch was downloaded from the Internet and ask you if you want to proceed. Click the Open button to allow the installer to continue. You might also be prompted for an administrator password in order to allow the installer to copy the appropriate files to the Mac OS X Applications folder.
The VMware Fusion installer will eventually prompt you to choose to enter a license key or to install VMware Fusion on a trial basis. If you purchased VMware Fusion from VMware’s site, enter the license key that was provided by VMware. If you want to try VMware Fusion for 30 days before you decide to purchase it, indicate that you want the 30-day trial. If you choose to try VMware Fusion for 30 days instead of entering a license key, you will ultimately be asked to provide your e-mail address to begin the trial.
With VMware Fusion successfully installed on your Mac, you can launch the application directly from the Applications folder by double-clicking the VMware Fusion icon within that folder. You can also drag the VMware Fusion application icon to the Mac OS X Dock for more convenient single-click access.
Creating a Windows Virtual Machine
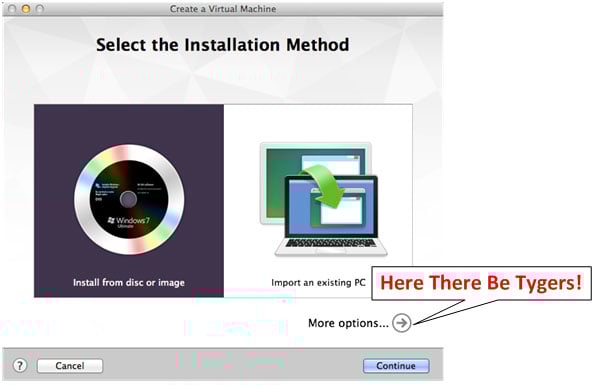
When you launch VMware Fusion for the first time, you should see Fusion’s Create a Virtual Machine window. If you have previously installed VMware Fusion and already have virtual machines configured, you might instead see the Fusion Virtual Machine Library window or an existing VM window that contains a Play button. In that case, click File > New on the VMware Fusion menu bar to open the Create a Virtual Machine window.
From the Select the Installation Method screen of the Create a Virtual Machine window, you can select either the Install from disc or image icon or the Import an existing PC icon. For the purposes of this walk-through, we’re going to assume that you want a fresh installation of Windows in your VM, so select the Install from disc or image icon and then click the Continue button. You might be tempted to click the More options… button on this screen. Down that trail lie all kinds of alternate universe methods of VM building, like creating a VM from a Boot Camp partition or from your Mac OS X recovery partition. We’re not going to explore those options here.
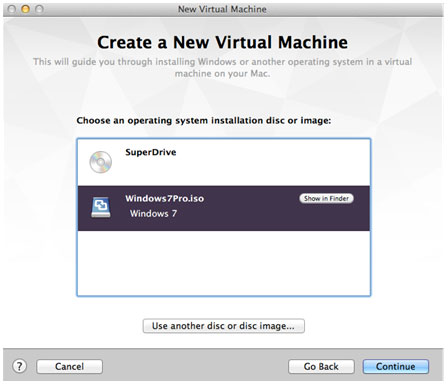
The next piece of information that Create a Virtual Machine is going to want is the location of your installation media. As previously mentioned, that can be a CD, a DVD, or an ISO file that resides on your hard drive or a flash drive. If you have a CD or a DVD, you should select the drive that contains the installation files from the list of drives displayed in the window and then click the Continue button. Otherwise, click the Use another disc or disc image… button, locate the ISO file by navigating the file system from the Open File dialog box, select the ISO file you want, and then click the Open button followed by the Continue button. In the following example, a Microsoft Windows 7 Professional ISO file has been selected as the installation medium.
The next screen you should see is the Microsoft Windows Easy Install screen, where you can choose to allow VMware Fusion to handle most of the details of the installation or you can choose a manual installation path. By default, the Use Easy Install check box is selected. Because it is the path of least resistance on our quest, we’re going to go the Easy Install route. First, you must provide Easy Install with some basic information, such as the administrator account name you want to use in Windows. You should also select the version of Windows you are installing from the Choose your Windows version drop-down menu.
The rest of the information on this screen, which includes Password, Confirm Password, and Windows Product Key is technically optional, even though the (optional) tag appears only after the Password field. If you do not provide a password, you might need to provide it further along in the Windows setup process or your installation will be less secure. You might be installing Windows in a VM, but securing virtual Windows is just as important as securing it on a physical machine, especially if you’re connecting the VM to a network.
Additionally, if you do not provide a Windows product key, VMware Fusion will warn you that your installation might fail. If the installation succeeds without a product key, your copy of Windows will most likely install as a trial version that will prompt you for activation after a given amount of time. After you have provided all the necessary information, click Continue.

Next, you must choose the level of integration you want the new VM to have with the host Mac OS X system. The More Seamless option means that the VM will have direct access to files that are stored on the physical machine. For example, files you place on your Mac OS X desktop will also appear on your Windows VM’s desktop, pictures stored in your Mac OS X Pictures folder will also appear in the Windows VM’s Pictures folder, and so on. Although convenient for reading and writing the same copy of a file in both environments, the More Seamless option can open the host OS to some security risks simply because the VM’s OS can access files stored on the host system. Therefore, a virus or a Trojan horse that infects the VM could also put the host system at risk. The More Isolated option, on the other hand, configures the VM so that its OS is essentially unaware of the file system that resides on the host OS. You can then copy files to and from the VM and host by dragging and dropping them into and out of the VM window. After you select the integration option you want, click the Continue button.

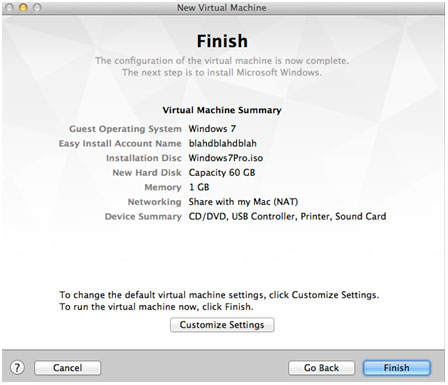
Now comes the fun part: the Finish screen. On this screen, you get to see the default settings VMware Fusion has selected as the amount of RAM, the capacity of the virtual hard drive, and the number of core processors for your VM, assuming you used the Easy Install method.
Oh, man! I can hear you cry. One gigabyte of RAM is not enough for all my Boson software and my MMORPG PC gaming needs! One gig might have been an impossible dream in the King’s Quest days, but I can’t even render a decent Orc on less than four now!
Fear not! You are not stuck with VMware Fusion’s default selections. You can change the stingy default settings by clicking the Customize Settings button on the Finish screen. You’ll be asked to save your new VM first, after which the VM window will open along with its Settings window. Once you’ve adjusted your settings, simply close the Settings window and click the gigantic Play button in the VM window to start the OS installation process in the VM. If you were happy with the stingy default settings, you can simply click the Finish button instead of the Customize Settings button to immediately start the VM and the OS installation process. Fair warning if you adjust your RAM, processor cores, or other settings: you can easily assign the VM too many of your host’s resources and put a serious drag on system performance. The good news is that you can also modify these settings after the VM has been created and configured. Therefore, it’s better to start on the low side and adjust upward as use and performance deem necessary. Note that if you do change your hardware settings after installing Windows, you might also be prompted to reactivate the copy of Windows you installed in the VM.
Configuring Windows in VMware Fusion
Now that the VM is configured, it’s time to sit back and let the Windows setup program do its thing. You might notice that your VM restarts several times (as most PCs do) during the Windows installation process. At some point in the hopefully-not-too-distant future, you’ll be presented with the Windows logon screen, where you can finally enter the password you created way back on the VMware Fusion Microsoft Windows Easy Install screen, access your Windows desktop in the VM window, and install all the applications you want, right?
Not so fast.
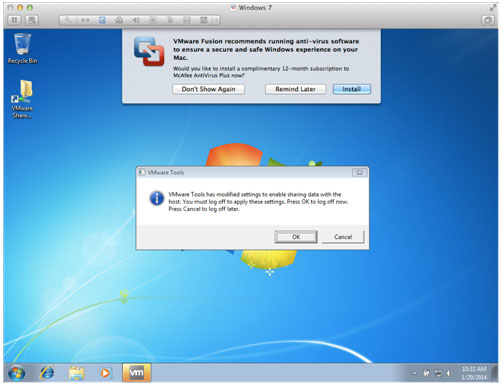
Before you start installing applications hither and yon, you must contend with the additional tools and updates your VM requires in order to ensure the safety and usability of your computing environment. The first thing you might see when you log on to your new Windows VM is a VMware Fusion dialog box recommending that you install antivirus software. You should heed that recommendation, although you are not required to install the specific antivirus solution that VMware Fusion recommends.
Next, if you downloaded the version of VMware Fusion that includes VMware Tools, you will be prompted to log off your VM and then log on again to enable any settings that VMware Tools modified. If you chose to have your VM more seamlessly integrated with your host environment, this is also the point at which you might notice files from your Mac OS X desktop appearing on your VM’s desktop.
Finally, you should apply any available security updates to Windows by using Windows Update. (In Windows 7, you can perform this action by clicking Start > All Programs > Windows Update). You should also consider examining Windows Firewall (Start > Control Panel > System and Security > Windows Firewall) settings for potential problems.
Only after you are certain your Windows VM is up-to-date and protected should you begin the next phase of the process, which is the installation of Boson software.
Installing Boson Software in a VMware Fusion Virtual Machine
If you’ve used Boson products on Windows in the past, the rest of this process should be familiar. If you haven’t, rest assured that installing Boson products on Windows is very similar to installing any other Windows application. You start by downloading the setup file.
The setup files for both the Boson Exam Environment and the Boson NetSim Network Simulator can be obtained by visiting the Boson downloads page. You will need to log on with existing Boson.com credentials, or create an account and then login with that account, to see and download the files. You can download the files by using the browser inside the VM or by using your Mac OS X browser of choice. However, you will need to run each of the setup files from inside the VM.
To install the Boson Exam Environment, double-click the BosonExamEnvironment-Setup.exe file you downloaded and follow the prompts. When the installer launches, click the Next button to proceed to the License Agreement screen, select the I accept the terms in the license agreement check box, and click the Next button.
You will then be prompted for the file system location in which you want to install the Boson Exam Environment. Unless you have special requirements, choosing the default location by clicking Next should be fine.
Finally, you will be asked whether you want to create a desktop shortcut to the application. By default, the setup program will create a desktop shortcut on the virtual Windows desktop. After you make your selection, click the Install button.
The setup program will additionally install Microsoft .NET 3.5 Service Pack 1 if it is not already installed. The Microsoft .NET 3.5 Service Pack 1 framework is required by the Boson Exam Environment. If your virtual OS is Windows 7 Professional and you have applied the latest Windows Updates, your VM is probably already configured with .NET 3.5 Service Pack 1.
To install Boson NetSim Network Simulator, double-click the netsim9.exe file you downloaded and follow the prompts. If your virtual environment does not already have Microsoft .NET 4.0 installed, the setup program will prompt you to download and install Microsoft .NET 4.0. The Microsoft .NET 4.0 framework is required by Boson NetSim Network Simulator. Therefore, you need a functioning Internet connection in your VM before you can install NetSim.
To download and install the framework, click the Install button. After .NET 4.0 is downloaded and installed, you will be presented with the NetSim InstallShield Wizard Welcome screen. Click the Next button. Similar to the Boson Exam Environment setup process, you will be presented with a choice of where to install NetSim. The default should be fine in most cases, so click the Next button.
Finally, click the Install button to start copying files to the VM. After the installation completes, click the Finish button. You will then see a Boson NetSim 9 shortcut on the desktop of the VM.
Blending Your VM’s Boson Software with Your Mac OS X Desktop Environment
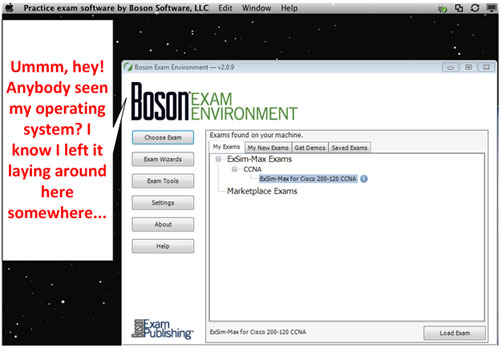
So now you can install and use Boson practice exams and Boson NetSim labs on a Mac.
But wait a minute here, you might be thinking. I don’t use Mac OS X so I can look at a Windows desktop all the live-long day. What if I want to use Boson software but not have to look at it on that !@#$%^& Windows desktop? Who wants to spend time switching between different OS interfaces just to get something done?
The answer, my fellow adventurer, is Unity. If you just spun up Google for a definition, let me inform you that I am not talking about video game development, a positive path for spiritual living, or the Ubuntu Linux project. Unity is the name of the VMware Fusion feature that allows you to hide a VM’s OS and use the VM’s applications as if they were natively launched from Mac OS X. Unity is one of three VMware Fusion views. The other two are Full Screen, which enables the VM to occupy all the display real estate and essentially cover up Mac OS X, and Single Window, which is the default windowed VM view. You can switch to Unity by clicking the Unity icon in the upper right corner of a VM window.
In Unity mode, the VMWare window disappears and your Windows applications run directly against the Mac OS X desktop. You might also notice that an icon for the Windows application you're running appears in the Mac OS X Dock, just like a native Mac app. In fact, you can even drag the application's icon permanently onto the Dock so that you can simultaneously launch the VM and the application from there. Be aware that the VM environment must be running for the application to launch in a timely fashion. Otherwise, clicking the Dock icon will launch VMWare Fusion, launch the associated VM, start the VM, require you to log on, and only then launch the application. To switch back to the non-Unity view, you can use the default Command+Control+U keyboard shortcut.
And now we’ve reached the point where we must save our game. The second task in our .NET quest is complete.
From here, some of you may consider your journey at an end. For others, VMware Fusion might not be the Mac OS X desktop virtualization experience you’d hoped. There are other solutions. We’ll explore a different one when we pick up with .NET Quest, Part III: A Parallels Universe.
Are you studying for an IT certification exam? Download our Boson Exam Environment and NetSim Network Simulator and try our demos today!