
By James Hanback
Very few Sierra On-line adventure games from the 1980s and early 1990s contained the kind of first-person shooter action that would later come to dominate the PC gaming landscape. Mostly, the Sierra adventure gamer had to rely on his or her wits, knowledge, and perhaps the printed manual to piece together the clues that would eventually lead to the game’s solution. Some games, like Police Quest, required some real-life knowledge of police procedure to even get past the parking lot of the fictional Lytton, Calif., police station. Others, like Conquests of Camelot, required some research into arcane flower symbolism (which was helpfully documented in the game’s printed manual, the Liber Ex Doctrina). Similarly, you might find that you need to rely a little more on your own knowledge of your computer hardware to complete this phase of our adventure as we restore our game from the previous three posts and continue our quest to use Boson software in a non-Windows environment.
As with VMware Fusion and Parallels Desktop for Mac, Oracle’s VirtualBox can be used to create virtual machines (VMs) that run Microsoft Windows within a Mac OS X (or other) environment. In contrast to the two commercial products, VirtualBox is an open source product that is released under the GNU General Public License (GPL), which means that you can download, use, modify, and redistribute the software free of charge. Therefore, VirtualBox can reduce your total cost of ownership (TCO) by the price of a commercial desktop virtualization solution if you choose to use it instead of VMware Fusion or Parallels Desktop. The gotcha, if you want to call it that, is that VirtualBox can be more difficult to configure for less-technical users than the two commercial solutions, both of which use simpler wizards and default settings that you must bypass to obtain more granular control over a VM’s creation. On the other hand, VirtualBox’s less-wizardy approach means that you can easily examine its recommended settings and choose at the outset how much of your computer’s hardware resources are dedicated to a given VM rather than tweak those settings after the VM’s creation is complete.
This seems like a good time to point out that your co-adventurer’s successes and failures with a solution like VirtualBox might not be your successes and failures because this entire phase of our quest is taking place on a late 2006 model Mac Book Pro with an Intel Core 2 Duo processor, Mac OS X 10.7.5, and 3 GB of RAM. The minimum adventurer’s inventory you will need to successfully complete this task includes all of the following:
- An Intel Mac with enough RAM to comfortably run both the host OS and any guest OSs you plan to install
- At least 30 megabytes (MB) of hard drive space for VirtualBox and several gigabytes (GB) of free space for each guest OS you plan to install
- A fairly modern version of Mac OS X
- A copy of VirtualBox
- A Microsoft Windows installation medium (CD, DVD, or ISO file) and a valid Windows product key
- A processor that supports VT-x Basic Input/Output System (BIOS) virtualization extensions if you plan to install Windows 8; if you have an older Intel Mac, you might need to install a firmware update to enable the VT-x extensions
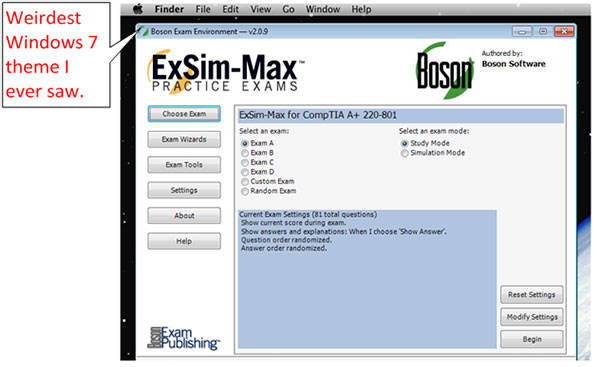
- A copy of either the Boson Exam Environment setup program or the Boson NetSim Network Simulator setup program, depending on the product you want to install; you can download both setup programs from the Boson download page
- Enough knowledge about your computer’s hardware to know when it’s safe to adjust VirtualBox’s recommended settings and when you should leave well enough alone
With your inventory gathered, it’s time we got going on this leg of our journey. Let’s walk our adventurer off to the next scene.
Installing VirtualBox
Installing the VirtualBox application on a Mac is similar to installing VMware Fusion or Parallels Desktop. First, you must download VirtualBox. The Mac OS X version should arrive in your Downloads folder as an Apple Disk Image (DMG) file. Double-click the file to mount the disk image on your desktop. Next, double-click that disk image to open it. Within the disk image is a file named VirtualBox.pkg. Double-click that file to launch the installer.
The first step in the installation process will be a test to verify that the software can be installed on your Mac. Click the Continue button to perform the test, then click the Continue button on the Introduction screen. Finally, click the Install button and enter your Mac OS X administrative credentials when prompted. When the installation completes, you will see a Summary screen. Click the Close button.
By default, VirtualBox will be installed in your Mac OS X Applications folder. You can launch the application from there, or you can drag the VirtualBox icon from the Applications folder to the Mac OS X Dock for more convenient access.
Creating a Windows Virtual Machine in VirtualBox
Unlike our previous walk-throughs, the first screen you see when you launch VirtualBox will not be an OS installation wizard. Instead, you’ll be placed directly into the Oracle VM VirtualBox Manager window. This window contains two vertical panes. The left pane contains a list of all the VMs that have been configured in VirtualBox. The right pane contains a wealth of information about the VM that is selected in the left pane. At this point, you most likely have no VMs in the left pane, so click the New button in the Oracle VM VirtualBox Manager toolbar to create a VM.
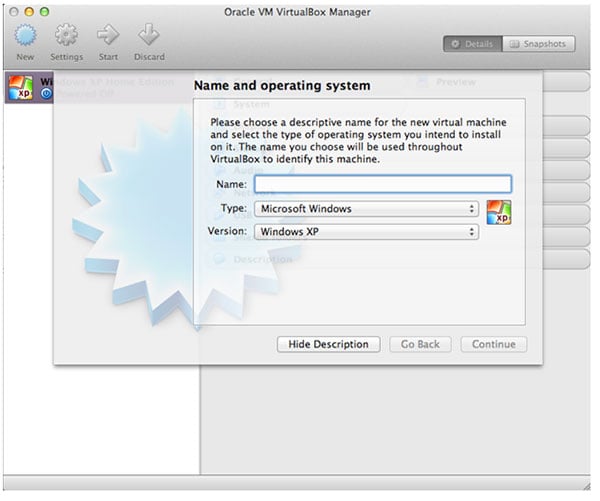
VirtualBox will ask you to fill in some information on the fields in the Name and operating system screen. You should name the new VM after its OS or by its purpose. For example, if you are going to create multiple Windows 7 Professional VMs but only use one for Boson software, you might type something like Windows 7 for Boson in the Name field on this screen. Next, select the type of OS you are installing from the Type drop-down menu. In this case, you want the Microsoft Windows option. Finally, select the version of Windows you are installing from the Version drop-down menu. In the following screen shot, the Windows XP option is selected by default. However, your humble co-adventurer changed that to Windows 7. When you have filled in all the fields, click the Continue button.
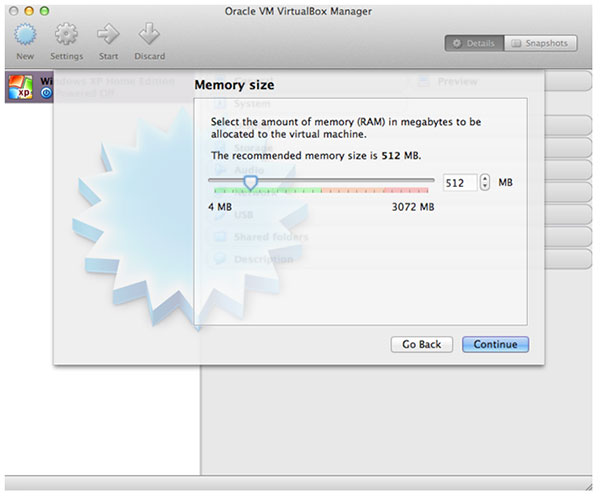
On the next screen, VirtualBox will suggest an amount of random access memory (RAM) to use for the OS you selected. In the screen shot below, VirtualBox has suggested 512 MB of RAM for an installation of Windows 7 based on your co-adventurer’s hardware and guest OS selection. Interestingly, that falls well below Microsoft’s minimum system requirements for a Windows 7 installation. Fortunately, you are not required to stick with VirtualBox’s suggestion. By moving the slider to the left or right, you can decrease or increase the amount of RAM that the VM will use. However, use caution when increasing the amount of RAM. VirtualBox knows how much actual RAM you have, and it will warn you that you could negatively affect the performance of your host OS if you push that slider up above the green side of the 50 percent mark. In this case, your co-adventurer’s hardware has a total of 3 GB of RAM. Therefore, he could safely bump the VM’s RAM up to 1 GB without using more than 50 percent of the total RAM. After you have adjusted the RAM (or not), click the Continue button.
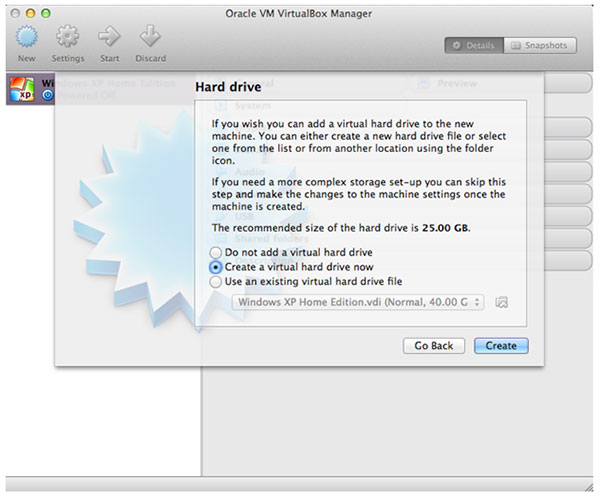
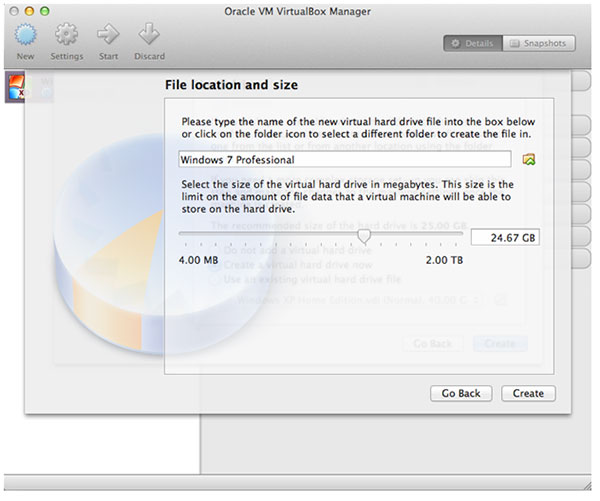
Next, VirtualBox will ask you to make some decisions about how you want the VM to store its data. You have three options: Do not add a virtual hard drive, Create a virtual hard drive now, or Use an existing virtual hard drive file. That last option will additionally require you to locate and select the existing virtual hard drive file you want to use. If you select Do not add a virtual hard drive, VirtualBox will warn you that you will not be able to install a new OS on the VM until you add a virtual hard drive. Therefore, to start the VM, you will need to attach a virtual optical disk, such as an ISO file that contains a live DVD image. For our purpose, we want to create a new virtual hard drive on which to install Windows 7 and Boson software, so select the Create a virtual hard drive now radio button and then click the Create button. You might also notice that VirtualBox has recommended a virtual hard drive size of 25 GB, which is above the 16 GB minimum requirement for Windows 7. For now, just remember that recommendation because we can’t do anything about it here.
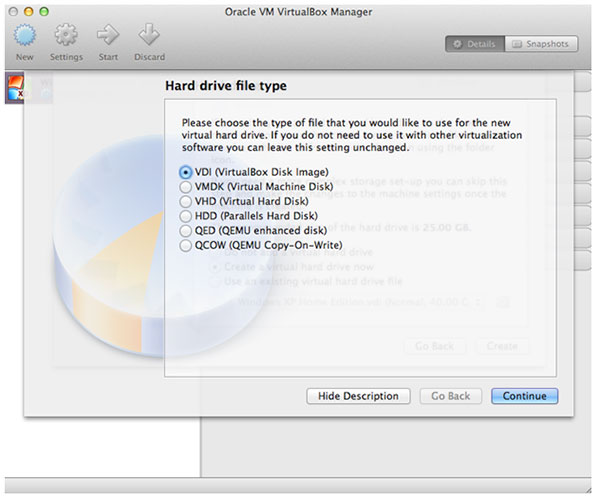
Now here’s a little trail in our quest we’ve never been down before. VirtualBox wants to know what file format to use to create the virtual hard drive. By default, VirtualBox will choose the VirtualBox Disk Image (VDI) format. If you want to use the VM you are creating with other desktop virtualization software, such as VMware Fusion or Parallels Desktop, you can choose an alternate format. For example, choosing the Parallels Hard Disk (HDD) format will enable you to use the VM with Parallels Desktop. Choosing the Virtual Machine Disk (VMDK) format will enable you to use the VM with VMware Fusion. After you have selected a virtual disk format (or not), click the Continue button.
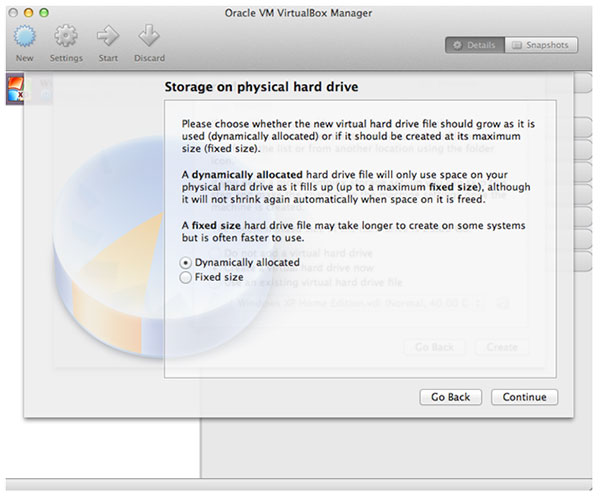
Augh! you might be thinking. Will we never get out of virtual hard drive land? Fear not. There are only two more decisions you will need to make before we enter the next clearing. First, VirtualBox needs to know how you want to store the new virtual disk on your host, or physical, hard drive. Selecting the Dynamically allocated radio button configures the virtual disk to use a minimal amount of physical hard drive space in the beginning. As space in the VM is used by the OS and by data, VirtualBox will automatically expand the virtual disk file size to accommodate the need. If you select the Fixed size radio button, VirtualBox will create the virtual hard drive at the full size you specify for the VM, which means that you will immediately lose a specific amount of physical hard drive space to the VM instead of losing it over time. After you have made your selection, click the Continue button.
Finally, VirtualBox will ask you for the physical hard drive location you want to use to store the virtual disk. Additionally, you will be asked to decide how large you want the virtual disk to be. You can choose a location other than the default by clicking the folder icon to the right of the location field. Remember that recommended virtual hard drive size of 25 GB way back two screens ago? Here’s where you can adjust it by moving the slider on this screen left or right. If you selected a dynamically allocated disk on the previous screen, the size you specify by using the slider will be the maximum size to which the virtual disk can grow. If you selected a fixed size on the previous screen, the size you specify here will be the amount of physical hard drive space you immediately lose to the virtual disk. When you are done making your selections, click the Create button.
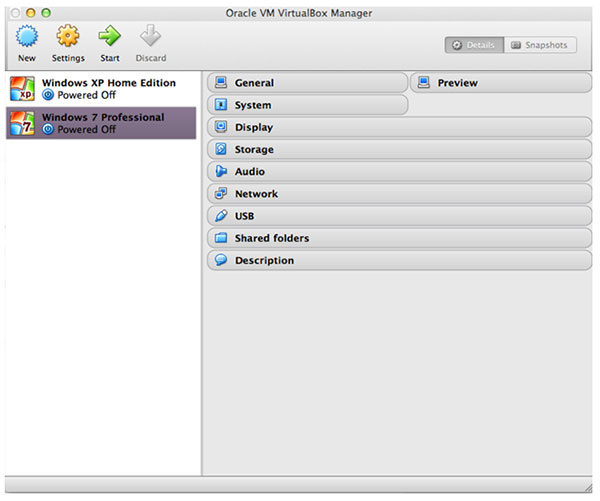
After VirtualBox completes the virtual disk creation process, you will be returned to the Oracle VM VirtualBox Manager screen. The new VM you just created should be visible in the left pane. If you select the new VM, you will see a list of specification categories appear in the right pane, including General, System, Display, Storage, and more. Clicking one of those categories will reveal information about the VM’s configuration.
By this point in the process, you might be tempted to breathe a sigh of relief. Your VM is created. Hold back that sigh for now, though, because you have not yet installed an OS. And what good is a VM if you can’t use it? Naturally, before you can install an OS on a new computer, you must power on that computer. The same goes for your VM. Ensure that your new VM is selected in the left pane of the Oracle VM VirtualBox Manager window, and then click the green arrow labeled Start.
VirtualBox will helpfully remind you that you have not yet installed an OS by prompting you to select either a virtual optical disk or a physical optical disk from which to start the VM. From the drop-down menu in this dialog box, you can select a physical drive that contains Windows installation media, or you can browse your computer’s physical hard drive for an ISO file that contains a Windows installation. After you have made your selection, click the Start button.

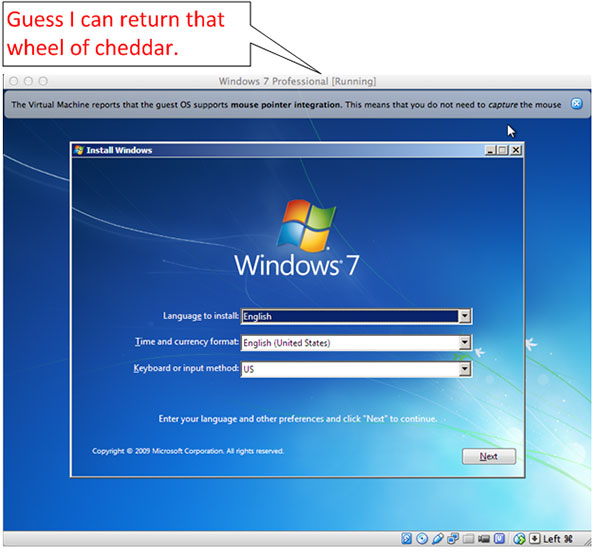
If all has gone well up to this point, you should soon see the Starting Windows splash screen in your VM window. Depending on your configuration, you might also see a little VirtualBox message telling you that you do not need to capture the mouse. Good thing! We didn’t include any traps or cheese in your adventurer’s inventory. Basically, VirtualBox is simply letting you know that you can move your mouse cursor seamlessly between the guest OS and the host OS without having to capture the mouse to the VM or release it from the VM. If the guest OS does not support mouse pointer integration, you will need to click inside the VM window to enable the guest OS to use the mouse. To release the mouse from the VM and give it back to the host OS, press the Host key. You can permanently close the mouse pointer integration message by clicking it and then selecting the Do not display this message again check box.
Configuring Windows in VirtualBox
Now that the VM is configured, let’s adventure our way to the next scene, which is the Windows installation process. This should be a mostly familiar path to you if you’ve been tagging along on the previous posts. However, unlike our previous VM solutions, you will notice that you’re required to provide a bit more information to Windows Setup. Both VMware Fusion and Parallels Desktop prompt you for some of the Windows Setup program’s required information before the actual process of installing Windows begins. VirtualBox allows Windows Setup to prompt you for its own information. As such, you will need to complete the following steps:
- Choose your language, time and currency, and keyboard format, and click the Next button.
- Click the Install Now button.
- Select the I accept the terms of the license agreement check box, and click the Next button.
- If you are not upgrading Windows, choose Custom Install and click the Next button.
- You’ll be prompted for where you want to install Windows; click the Next button to accept the selection.
- After some file copying and reboots, you’ll be prompted to create a user name and a PC name. Perform these steps and click the Next button.
- Create a secure password, confirm it, and optionally create a password hint. Click the Next button (are you sensing a pattern here?).
- Enter your Windows product key to activate Windows, and click the Next button; or, if you’re installing a trial version of Windows, click the Skip button.
- Select or verify automatic Windows Update settings.
- Verify or set the date and time, and click the Next button.
- Select the computer's network location.
Provided all goes well, Windows will eventually transport you to its logon screen, where you should enter the password you created during the installation process. At this point, it’s probably a good idea to go ahead and install VirtualBox Guest Additions, which is the VirtualBox equivalent of VMware Tools and Parallels Tools. VirtualBox Guest Additions contains several device drivers and applications that enhance the VirtualBox VM experience. You can install Guest Additions by clicking Devices > Insert Guest Additions CD image in the VM’s menu bar. If the Guest Additions installer does not launch automatically, you can manually start it in Windows by clicking Start > Computer, double-clicking the Guest Additions disk image, and then double-clicking the installer file. Then simply follow the prompts.
With Windows and Guest Additions successfully installed, you should next ensure that both your VM and its host environment are protected against any maliciousness lurking out there in the dark forest of the Internet. Protecting your Windows VM (and subsequently your host OS from security problems that might be created by your VM) consists of three steps:
- Install some antivirus software. VirtualBox does not come with a suggested antivirus solution. Therefore, you should carefully select and install one that is appropriate to your needs.
- Apply the latest Windows updates. In Windows 7, you can perform this action by clicking Start > All Programs > Windows Update.
- Review Windows Firewall settings. In Windows 7, you can do this by clicking Start > Control Panel > System and Security > Windows Firewall.
Only after you are certain your Windows VM is up to date and protected should you venture on to the next scene in our quest.
Installing Boson Software in a VirtualBox Virtual Machine
If you’ve been following our previous paths in this adventure, this section of forest should also be quite familiar by now. Here’s the abbreviated walk-through:
- Obtain the appropriate setup file from the Boson downloads page.
- To install the Boson Exam Environment, double-click the BosonExamEnvironment-Setup.exe file.
- Click the Next button to proceed to the License Agreement screen, select the I accept the terms in the license agreement check box, and click the Next button.
- Choose the install location, and then click the Next button.
- Click the Install button.
- The setup program will install Microsoft .NET 3.5 Service Pack 1 if it is not already installed.
- To install the Boson NetSim Network Simulator, double-click the netsim9.exe file.
- Click the Install button to download and install Microsoft .NET 4.0.
- Click the Next button on the NetSim InstallShield Wizard Welcome screen.
- Click the Next button to install NetSim in the default location.
- Click the Install button to start copying files to the VM.
- Click the Finish button.
Blending Your VM’s Boson Software with Your Mac OS X Desktop Environment
With your Boson software successfully installed and activated, we are now ready to push our adventurer through the Microsoft Windows shrubbery of this scene and into the clearing of the Mac OS X desktop. Like VMware Fusion’s Unity mode and Parallels Desktop’s Coherence mode, VirtualBox’s Seamless mode enables you to hide the desktop of the guest OS so that you appear to be running Windows applications directly against the Mac OS X desktop. VirtualBox is also capable of running a VM in Fullscreen mode or Scaled mode. Fullscreen mode enables the VM to occupy the entire display. Scaled mode simply runs the VM in a window.
There are a couple of different ways you can switch between view modes. You can use the VirtualBox View menu, which contains options such as Switch to Fullscreen, Switch to Seamless Mode, and Switch to Scaled Mode. Alternatively, you can use keyboard shortcuts. For example, the Host+F keyboard shortcut switches to Fullscreen mode, the Host+C keyboard shortcut switches to Scaled mode, and the Host+L keyboard shortcut switches to Seamless mode.
Whoa there, cowboy, you might be thinking. I must have a defective Mac. I don’t see a Host key anywhere on this thing.
Simmer down, now. Your Mac is not defective. The Host key is actually a VirtualBox invention, an existing key on your keyboard that has a special meaning when you use it from within VirtualBox. Nearly all of VirtualBox’s keyboard shortcuts in a VM require the use a Host key combination. By default, the VirtualBox host key is the left Command key on Mac OS X. However, you can configure which key VirtualBox should assign as the Host key by clicking VirtualBox > Preferences > Input from the menu bar, clicking the Virtual Machine tab, and then modifying the value of the Host Key Combination field.
It’s probably important to note here that whether VirtualBox’s Seamless mode works for you depends on your configuration. Some users have reported problems getting Seamless mode to work because of various display settings related to the VM, such as Direct2D acceleration and Direct3D acceleration. If Seamless mode does not work on your system, you might need to adjust some of those settings to get it right.
So now you can run Boson software in your Mac environment and save a little on your TCO because you’re not using commercial desktop virtualization. That doesn’t mean this solution isn’t without its issues. After all, there’s no way a desktop virtualization solution will ever be able to perform as well as an OS that is physically installed on the hardware. There’s good news, though. Because Apple uses the Intel architecture in its computers these days, you can physically install Windows on its own hard drive partition on a Mac instead of using desktop virtualization.
However, this looks like a good place to save our game again. Next time, we’ll send our little pixelated adventurer off to learn the ropes of physically installing two OSs on the same Mac in .NET Quest, Part V: Off to Boot Camp.