
By James Hanback
Now that you know what an IP version 6 (IPv6) address is, how to identify the types of IPv6 addresses, and how to subnet a block of IPv6 addresses, it’s finally time to configure IPv6 on a network. Perhaps your boss has finally shown some interest and asked you what that whole World IPv6 Launch anniversary you mentioned was all about. Perhaps you’ve simply decided that it’s time to put into practice the topics you’ve been studying in pursuit of your certification. However it happened, you’re ready to implement IPv6 on your network.
You might also believe you are ready to chuck old IP version 4 (IPv4) into obsolescence.
Don’t.
Although you might be ready, it’s possible that your service provider networks, the network services that operate on your company’s network, or even end users who connect their own (officially approved, of course) devices to your company’s network, are not quite ready for that leap. If that’s the case, how do you reconcile your own desire to forge ahead in the name of progress with your company’s need to remain with its feet firmly planted in IPv4?
The answer is to configure IPv6 alongside the existing IPv4 network and make the transition over time as IPv6 adoption expands. There are several ways of accomplishing that task. But first I should remind you to buckle your safety belt and ensure that your tray tables are up and your seat backs are in their full upright positions. We’re about to take off, and there’s much to discuss.
Flying the Direct Route with Dual Stacks
Perhaps the simplest way to configure IPv6 alongside IPv4 is to configure IPv6 on dual-stack devices. A dual-stack device can be configured with both an IPv4 address and one or more IPv6 addresses. Thus a dual-stack device can operate on the IPv6 network independently from the IPv4 network. In other words, the device can be configured to operate on two separate Transmission Control Protocol / Internet Protocol (TCP/IP) stacks. Dual-stack devices do not send IPv6 traffic over an IPv4 network, nor do they send IPv4 traffic over an IPv6 network. That’s a good reason to not go around disabling IPv4 stacks as you implement IPv6.
For example, let’s say you configure several Windows 7 Professional workstations and a file server with IPv6 addresses in the same prefix. You ping between those workstations and feel the warm glow of satisfaction when you see results indicating a zero percent loss. So happy are you that you that pop open the Local Area Connection Properties dialog on your own workstation, deselect the Internet Protocol version 4 (TCP/IPv4) stack, and then click the OK button. Now what? Suddenly your file server share mappings get disconnected. Yet you can still ping the server and the other Windows 7 Professional workstations that you configured to use IPv6. What happened?
The answer, of course, is that the file server’s file sharing services are not operating on the IPv6 stack. Fortunately, you can easily re-enable the IPv4 stack on your workstation to regain access. Now you’ve learned a valuable lesson: just because you’re IPv6-ready doesn’t mean the rest of the world has caught on yet! Therefore, operating in a dual-stack environment makes sense until IPv6 surpasses IPv4 in ubiquity.
So how do you configure a dual-stack device? A typical Local Area Connection interface on a PC running Microsoft Windows 7 Professional can simultaneously be configured to use both an IPv4 network and an IPv6 network, as shown in the following screen shot:

Let’s assume the PC is already configured to operate on IPv4. If you double-click that Internet Protocol Version 6 (TCP/IPv6) stack, Windows will present you with the following properties dialog:
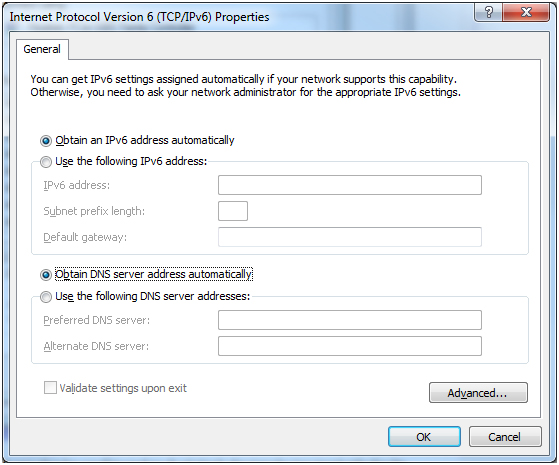
As you can see, configuring an IPv6 address in Windows 7 Professional is very similar to configuring an IPv4 address in same. The configuration requires an IPv6 address, the IPv6 subnet prefix from which the address is being allocated, an IPv6 default gateway, and IPv6 Domain Name System (DNS) settings. You might notice that, by default, Windows will attempt to obtain all this addressing information automatically, which leads me to point out that there are a couple of different ways to facilitate the automatic configuration of IPv6 addresses.
Flying on Autopilot
If you’re accustomed to deploying IPv4 and you don’t already have a Dynamic Host Configuration Protocol version 6 (DHCPv6) server out there on your network, you might be surprised to learn that the host has already configured some portions of the IPv6 stack just by virtue of the stack being installed and active in the OS. To see what I mean, open up a command prompt on a Windows host that has an active TCP/IPv6 stack and issue the ipconfig command without any switches.

There. If the TCP/IPv6 stack is up and functioning, you’ll most likely notice that the Local Area Connection adapter has already been assigned a link-local IPv6 address. The automatic configuration of an IPv6 address without the requirement of a DHCPv6 server is known as stateless autoconfiguration. You’ll recall from Part II of this series that IPv6 requires the assignment of a link-local address. Link-local addresses allow network communication specific to the network segment or to a point-to-point connection, but are not routable over the Internet. However, stateless autoconfiguration does not apply only to link-local addresses. The very basics of the process work this way:
- A host automatically configures or, more technically, proposes its own link-local address from the FE80::/10 prefix by generating an interface identifier that is calculated from the network interface’s Media Access Control (MAC) address. This type of interface identifier is known as an extended unique identifier (EUI)-64 interface ID.
- The link-local address is tested for uniqueness. If the address is not already in use, the host can use the address on the network segment.
- When the link-local node is active on the segment, it can announce itself and receive router advertisements from an IPv6 router that is operating on the same segment. If an IPv6 router exists and can function as an IPv6 gateway, it will advertise that functionality as well as the globally unique prefix with which it is configured and which connected nodes should use.
- The host combines this globally unique prefix with the host’s own locally generated interface identifier to assign itself what is most likely a globally unique address.
Stateless autoconfiguration is actually really easy to test if you have access to an IPv6-enabled Cisco router or lab. Make sure you have a couple of hosts (or spare IPv6-capable routers that can serve as hosts) connected to a switch that is connected to the IPv6 router that we’ll pretend is your gateway device. The first thing you’ll need to do is enable IPv6 unicast routing on the gateway. It’s disabled by default on Cisco routers. If you don’t enable it, the Cisco router will not send the IPv6 router advertisements that are required for stateless autoconfiguration of non-link-local addresses. You enable IPv6 unicast routing by issuing the ipv6 unicast-routing command in global configuration mode, like so:
Router1#configure terminal
Router1(config)#ipv6 unicast-routing
Next, you will need to configure an IPv6 address on the gateway’s local area network (LAN)connected interface. Because you are configuring the router that will be responsible for providing stateless configuration information to other hosts, you will most likely manually configure the IPv6 address on that interface. To manually configure an IPv6 address on a Cisco router interface, you must issue the interface ipv6 address/prefix command in interface configuration mode. In the following example, we’re going to use a pseudo-randomly generated unique local address (ULA) /64 prefix on which we’ll pretend we want our LAN to operate:
Router1(config)#interface fastethernet 0/0
Router1(config-if)#ipv6 address fd5f:aa6d:51fd:e3c2::1/64
Router1(config-if)#no shutdown
The ipv6 address fd5f:aa6d:51fd:e3c2::1/64 command configures the FastEthernet 0/0 interface to operate in the FD5F:AA6D:51FD:E3C2::/64 prefix and use an interface ID of 0000:0000:0000:0001. We’ll discuss pseudo-random ULA prefix generation more later; but for now, you should know that this particular Cisco router can send IPv6 router advertisements that can be used to configure host interfaces with an IPv6 prefix of FD5F:AA6D:51FD:E3C2::/64 and a host-calculated EUI-64 interface identifier. If you have IPv6 Windows, Mac OS X, or Linux hosts connected to this LAN segment, they should now be able to automatically configure themselves with an IPv6 address from this prefix, as shown in the following screen shot from an Ubuntu virtual machine (VM):

If you are using additional Cisco routers as hosts in this experiment, you’ll need to perform one more step and enable IPv6 autoconfiguration on the LAN-connected host interface. You can do this by issuing the ipv6 address autoconfig command in interface configuration mode, like so:
HostRouter#configure terminal
HostRouter(config)#interface fastethernet 0/0
HostRouter(config-if)#ipv6 address autoconfig
HostRouter(config-if)#no shutdown
If all goes well, you should be able to issue the show ipv6 interface brief command on HostRouter and see that the FastEthernet 0/0 interface not only has a link-local IPv6 address from the FE80::/10 prefix, but also has a ULA from the FD5F:AA6D:51FD:E3C2::/64 prefix. If you want to see the stateless autoconfiguration process in depth in real time, issue the debug ipv6 packet command on each Cisco router in the experiment prior to issuing the no shutdown command on any of the interfaces.
IPv6 addresses can also be automatically assigned by using stateful configuration or a DHCPv6 server. This solution might be most appropriate for larger networks because it enables the automatic configuration of much more than the IPv6 address and the default gateway, thereby reducing some administrative overhead. Similar to an IPv4 Dynamic Host Configuration Protocol (DHCP) server, a DHCPv6 server can be configured to assign IPv6 addresses from a pool of addresses. A DHCPv6 server can also assign the default gateway, DNS servers, and other network information. Microsoft’s DHCPv6 server can actually be configured in a stateless mode, which essentially means that all IPv6 network configuration information except the host’s IPv6 address is configured for the host by the DHCPv6 server.
Flying on Your Private Jet
You might have noticed that I used the term globally unique, not global unicast, to describe the stateless autoconfiguration of IPv6 addresses by way of router advertisements. That’s because, as you saw in our stateless autoconfiguration test, the router could technically be configured with a ULA rather than a global unicast address. If you’ll recall from Part II of this series, a ULA, which is defined in RFC 4193, is similar in function to an IPv4 RFC 1918 address in that it is not routable over the Internet and is used on private LANs. Although ULAs are not routable over the Internet, they can be routed to other ULAs, just as RFC 1918 addresses can.
However, one big difference between RFC 4193 and RFC 1918 is that RFC 4193 addresses are still intended to be globally unique addresses. That means no one else in the world should technically be using the same ULAs on which your private LANs operate (although duplication will always be a possibility). Therefore, if you’re going to deploy ULAs on a private LAN, there are some rules you should follow to ensure that the ULA prefix you use has a good chance of being globally unique. The standardized ULA range of IPv6 addresses includes both the FC00::/8 prefix and the FD00::/8 prefix. However, you should use a prefix from the FD00::/8 prefix only. Use of the FC00::/8 prefix has not been completely defined in the standard. That narrows down your choice of ULA prefix a bit.
Next, RFC 4193 requires the use of an algorithm to generate a pseudo-random /48 prefix from the FD00::/8 prefix. The pseudo-random prefix helps reduce the likelihood of prefix collisions, which occur when two connected subnets use the same prefix. If you’ve ever attempted to connect two separate IPv4 organizations over a wide area network (WAN) only to discover that both organizations were operating in the 192.168.1.1/24 IPv4 address range, you have experienced a prefix collision.
After FD, the next 10 hexadecimal characters (or 40 bits) that form the ULA prefix’s global ID will be derived from the pseudo-random algorithm. Now you have a /48 ULA subnet from which you can choose a standard /64 ULA subnet to use for a private LAN. Yes, you read that right. You can go ahead and reserve an entire /64 prefix of 18,446,744,073,709,551,616 IPv6 addresses on your private LAN. Will you ever have that many IPv6 hosts? Nah, probably not. But in spite of the illustration we used for IPv6 subnetting in the last post and in spite of the IPv4 conservation effort that’s been hammered into your brain since you first learned about IPv4, the IPv6 address space is vast enough to essentially render address space conservation obsolete.
If all that pseudo-random selection of address space seems overwhelming, know that you’re not really on your own with that chore. There are sites that aid the pseudo-random prefix selection process, such as Simple DNS Plus and SixXS. SixXS even maintains a voluntary ULA prefix registration database in order to assist the IPv6 community in avoiding prefix collisions.
Booking Your International Flight
Now that you have a solid /64 prefix of ULAs, you can start assigning IPv6 addresses to hosts (or have stateless or stateful autoconfiguration do it for you) and get to enjoying all that IPv6 Internet goodness, right?
Well no, because, as you recall, neither link-local IPv6 addresses nor ULAs are routable over the Internet. In order to connect to the Internet, your IPv6 hosts must be reachable by global unicast IPv6 addresses. If your ISP supports IPv6 service in your area, you might already have a global unicast prefix available to you, in which case addresses from that prefix might have already been automatically assigned to the hosts that you connect to the Internet.
I know what you’re wondering.
You’re wondering why you should not just use the IPv6 equivalent of network address translation (NAT) to connect your network of ULA hosts to the Internet. You certainly could do that. NAT66 exists for that purpose. However, the use of NAT for IPv6-to-IPv6 connectivity is controversial because there is no need to conserve address space in IPv6 as there is in IPv4. Thus the peer-to-peer communication that NAT inhibits in IPv4 can technically be restored in IPv6. Of course, if you consider NAT to be part of your security infrastructure, you might need to reevaluate your stance on that. Remember that NAT was originally intended to extend the life of IPv4, not as a security measure. So rather than relying on NAT to protect devices on your private LAN from incoming connections, you should configure a stateful firewall to block such connections.
You can actually test whether your ISP supports connecting to the Internet over IPv6 by visiting http://www.test-ipv6.com/. If your readiness score is good, you should be able to connect to the Internet over IPv6. If your readiness score is not good, but you really, really, really want to connect to the Internet over IPv6, you’ll need to use some means other than a direct connection through your ISP. For example, you can connect to the IPv6 Internet over the IPv4 Internet by using a tunnel.
Making a Connection through Tunneling
Just like it sounds, tunneling is a means of sending traffic across a logical link without requiring that the intermediate devices between the endpoints be able to recognize or process the traffic. Although there are several different methods of IPv6 tunneling, some common methods are 6to4 tunneling, 6in4 tunneling, Teredo, and Intra-Site Automatic Tunneling Protocol (ISATAP).
6to4 tunnels send IPv6 traffic across an IPv4-only link by encapsulating the IPv6 traffic inside IPv4 packets. IP protocol 41 is added to the IPv4 header to indicate that the IPv4 packet encapsulates an IPv6 packet. However, 6to4 does not typically work if it is implemented behind NAT routers unless those NAT routers can forward protocol 41. Specific IPv6 and IPv4 ranges, 2002::/16 and 192.88.99.0/24 respectively, are reserved for use in 6to4 tunneling configurations.
6in4 tunneling is similar to 6to4 tunneling in that it uses IP protocol 41 to indicate an IPv6 packet encapsulated inside an IPv4 packet. However, 6in4 tunnels can use IPv6 address spaces outside of the 6to4 2002::/16 range. Additionally, 6in4 tunnels are not required to use the 192.88.99.0/24 IPv4 range as tunnel endpoints, but can instead make endpoints of static global IPv4 addresses assigned to an interface that is directly connected to the Internet. 6in4 tunneling is often used by managed tunnel providers, such as Tunnel Broker. Managed tunnel providers greatly simplify the process of creating and implementing 6in4 tunnels.
Teredo also works similarly to 6to4. However, Teredo is capable of tunneling from behind NAT routers. Teredo encapsulates IPv6 within IPv4 packets over User Datagram Protocol (UDP) instead of using IP protocol 41. The use of UDP ensures that the packet can be successfully forwarded from behind routers that block IP protocol 41.
Intra-site Automatic Tunnel Addressing Protocol (ISATAP) is yet another IPv6 tunneling mechanism. ISATAP essentially turns an IPv4 network into a virtual Layer 2 nonbroadcast multiple-access (NBMA) network for use by dual-stack hosts.
Coming In For a Landing
Now you have options. You know that you can implement IPv6 without breaking your existing IPv4 infrastructure by configuring dual stacks. You can experiment with IPv6, including ensuring your local network services can listen on and respond to IPv6 traffic, by implementing a small link-local network. Or, if you administer more than one LAN, you can go bigger and configure ULA prefixes in anticipation of connecting those LANs. Or you can go for the gusto and connect straight to the IPv6 Internet, directly or by using a tunnel.
Now that you know you have the option of configuring an IPv6 network without breaking your existing IPv4 infrastructure, you might find that you have the courage to test pilot IPv6 on your own rather than only reading study material about it.
After all, just like flying a plane, there is no substitute for experience.